Canon Pro1 PowerShot Pro1 Camera User Guide - Page 57
Auto Mode
 |
UPC - 013803034899
View all Canon Pro1 manuals
Add to My Manuals
Save this manual to your list of manuals |
Page 57 highlights
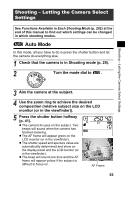
Shooting - Letting the Camera Select Settings See Functions Available in Each Shooting Mode (p. 202) at the end of this manual to find out which settings can be changed in which shooting modes. Auto Mode In this mode, all you have to do is press the shutter button and let the camera do everything else. 1 Check that the camera is in Shooting mode (p. 29). 2 Turn the mode dial to . Shooting - Letting the Camera Select Settings 3 Aim the camera at the subject. 4 Use the zoom ring to achieve the desired composition (relative subject size on the LCD monitor (or in the viewfinder)). 5 Press the shutter button halfway (p. 41). z The camera focuses on the subject. Two beeps will sound when the camera has finished metering. z The AF frame will appear green on the LCD monitor (or in the viewfinder). z The shutter speed and aperture value are automatically determined and show on the display panel and the LCD monitor (or in the viewfinder). z The beep will sound one time and the AF frame will appear yellow if the subject is difficult to focus on. AF Frame 53
-
 1
1 -
2
-
3
-
4
-
5
-
6
-
7
-
8
-
9
-
10
-
11
-
12
-
13
-
14
-
15
-
16
-
17
-
18
-
19
-
20
-
21
-
22
-
23
-
24
-
25
-
26
-
27
-
28
-
29
-
30
-
31
-
32
-
33
-
34
-
35
-
36
-
37
-
38
-
39
-
40
-
41
-
42
-
43
-
44
-
45
-
46
-
47
-
48
-
49
-
50
-
51
-
 52
52 -
 53
53 -
 54
54 -
 55
55 -
 56
56 -
 57
57 -
 58
58 -
 59
59 -
 60
60 -
 61
61 -
 62
62 -
63
-
64
-
65
-
66
-
67
-
68
-
69
-
70
-
71
-
72
-
73
-
74
-
75
-
76
-
77
-
78
-
79
-
80
-
81
-
82
-
83
-
84
-
85
-
86
-
87
-
88
-
89
-
90
-
91
-
92
-
93
-
94
-
95
-
96
-
97
-
98
-
99
-
100
-
101
-
102
-
103
-
104
-
105
-
106
-
107
-
108
-
109
-
110
-
111
-
112
-
113
-
114
-
115
-
116
-
117
-
118
-
119
-
120
-
121
-
122
-
123
-
124
-
125
-
126
-
127
-
128
-
129
-
130
-
131
-
132
-
133
-
134
-
135
-
136
-
137
-
138
-
139
-
140
-
141
-
142
-
143
-
144
-
145
-
146
-
147
-
148
-
149
-
150
-
151
-
152
-
153
-
154
-
155
-
156
-
157
-
158
-
159
-
160
-
161
-
162
-
163
-
164
-
165
-
166
-
167
-
168
-
169
-
170
-
171
-
172
-
173
-
174
-
175
-
176
-
177
-
178
-
179
-
180
-
181
-
182
-
183
-
184
-
185
-
186
-
187
-
188
-
189
-
190
-
191
-
192
-
193
-
194
-
195
-
196
-
197
-
198
-
199
-
200
-
201
-
202
-
203
-
204
-
205
-
206
-
207
 |
 |
