Canon imageFORMULA DR-2580C Compact Color Scanner User Manual - Page 71
Job Registration Tool Dialog Box, Editing Dialog Box, PDF/TIFF Settings, List of Job Button settings
 |
View all Canon imageFORMULA DR-2580C Compact Color Scanner manuals
Add to My Manuals
Save this manual to your list of manuals |
Page 71 highlights
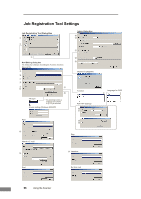
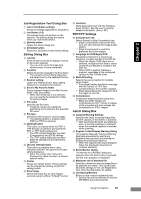
Chapter 2 Job Registration Tool Dialog Box a List of Job Button settings Shows the settings registered for Job Buttons. b Job Button (1-3) Correspond to the Job Buttons on the scanner. The Editing dialog box opens when you click these buttons. c [Admin] button Opens the Admin dialog box. d [Initialize] button Returns the Job Buttons to there factory settings. Editing Dialog Box e Job title Enter the title of the job to display in the list of Job button settings. ) You can enter up to 29 single-byte alphanumeric or kana characters. f Function Selects the function assigned to the Scan button. ) The contents of the Editing dialog box are determined by the selected function. g Scanner setting Opens the TWAIN driver's basic setting dialog box to configure the scanner. h Save to My Pictures folder Saves scanned images in the My Pictures folder in My Documents. ) When this check box is not selected, you can specify the destination folder for saving images. i File name Specifies the file name. ) Image file names are created by appending a time stamp to the specified file name. j File type Selects the file format for saved images. ) The [Setting] button is enabled when [PDF] or [TIFF] is selected. k [Setting] button This button is enabled when the PDF or TIFF file type is selected, and opens the PDF or TIFF Setting dialog box. ) The PDF setting dialog box provides [Compression] and [OCR] settings. ) The TIFF setting dialog box provides [Multi-tiff setting] and [Compression] settings. l [Access setting] button This button is available when using Windows 2000/XP, and opens the Access setting dialog box. ) Enter the correct User name and Password to obtain access to a shared network folder. m Printer Shows the default printer. Printer settings can be changed by clicking the [Printer setting] button. n Save Image Select this check box to save images scanned using the [Scan To Mail] Function. o Launcher Starts applications set with the Windows event function. See the user's guide for detailed information. (See p. 40.). PDF/TIFF Settings p Compression rate Selects [Normal] or [High Compression] rate. ) [High Compression] reduces the file's size, but also reduces the image quality slightly. ) [High Compression] is useful for grayscale and color images. q Language for OCR/Apply OCR Recognizes printed text in a document as characters, and adds text data to the PDF file. ) When the [Apply OCR] check box is selected, recognized text data is saved where the printed text is located in the PDF file. ) When OCR is applied, Deskew is enabled, regardless of the configured settings for the TWAIN driver. r Multi-tiff setting Selects the saving method for multiple page images. ) [One page] creates one file for one page with the number of TIFF files corresponding to the number of pages. ) [Multi pages] saves the images for all of the pages as one file. s Compression Compresses image files before saving them. ) Black and white images are compressed as CCITT Group 4 images, while grayscale and color images are compressed as JPEG images. Admin Dialog Box t Capacity Warning Settings Specifies the folder for saved image files, and the capacity of that folder, in advance. ) After specifying the folder and starting to scan, a warning message is displayed when the specified capacity is reached while scanning. u Register Folder/Display Warning Dialog The [Capacity Observed Folder] and [Warning Size] items are enabled by specifying a [Register Folder] (number) and selecting the [Display Warning Dialog] check box. ) When the capacity warning is displayed, follow the displayed instructions to continue scanning. v Show Monitor Dialog The Monitor for DR2580C dialog box appears when the Scan button is pressed, and the scan progress is displayed. w Maximum size of attached file Specifies a maximum size for image files to be attached to e-mails. This Quick Guide describes settings for the Job Registration Tool. Click the Help button for details. x Job Backup/Restore Backs up and restores registered jobs. ) Backup files can be restored on another DR-2580C document scanner. Using the Scanner 67
-
 1
1 -
2
-
3
-
4
-
5
-
6
-
7
-
8
-
9
-
10
-
11
-
12
-
13
-
14
-
15
-
16
-
17
-
18
-
19
-
20
-
21
-
22
-
23
-
24
-
25
-
26
-
27
-
28
-
29
-
30
-
31
-
32
-
33
-
34
-
35
-
36
-
37
-
38
-
39
-
40
-
41
-
42
-
43
-
44
-
45
-
46
-
47
-
48
-
49
-
50
-
51
-
52
-
53
-
54
-
55
-
56
-
57
-
58
-
59
-
60
-
61
-
62
-
63
-
64
-
65
-
 66
66 -
 67
67 -
 68
68 -
 69
69 -
 70
70 -
 71
71 -
 72
72 -
 73
73 -
 74
74 -
 75
75 -
 76
76 -
77
-
78
-
79
-
80
-
81
-
82
-
83
-
84
-
85
-
86
-
87
-
88
-
89
-
90
-
91
-
92
-
93
-
94
-
95
-
96
-
97
-
98
-
99
-
100
-
101
-
102
-
103
-
104
-
105
-
106
-
107
-
108
-
109
-
110
-
111
-
112
-
113
-
114
-
115
-
116
 |
 |
