Canon imageFORMULA DR-M140 Document Scanner User Manual - Page 22
Back View, Operating Panel, DFR Double Feed Release Button
 |
View all Canon imageFORMULA DR-M140 Document Scanner manuals
Add to My Manuals
Save this manual to your list of manuals |
Page 22 highlights
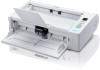
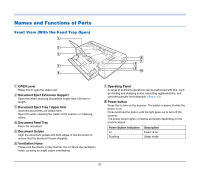
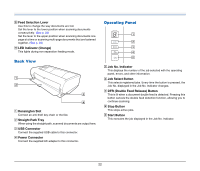
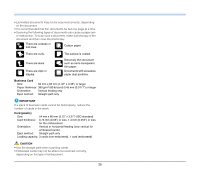
I Feed Selection Lever Use this to change the way documents are fed. Set the lever to the lower position when scanning documents consecutively. (See p. 26) Set the lever to the upper position when scanning documents one page at a time or scanning multi-page documents that are fastened together. (See p. 26) J LED Indicator (Orange) This lights during non separation feeding mode. Back View A1 B2 C3 D 4 A Kensington Slot Connect an anti-theft key chain or the like. B Straight Path Tray When using the straight path, scanned documents are output here. C USB Connector Connect the supplied USB cable to this connector. D Power Connector Connect the supplied AC adapter to this connector. Operating Panel A1 B2 C3 D E 4 A Job No. Indicator This displays the number of the job selected with the operating panel, errors, and other information. B Job Select Button This selects registered jobs. Every time the button is pressed, the Job No. displayed in the Job No. Indicator changes. C DFR (Double Feed Release) Button This is lit when a document double feed is detected. Pressing this button cancels the double feed detection function, allowing you to continue scanning. D Stop Button This stops active jobs. E Start Button This executes the job displayed in the Job No. Indicator. 22
-
 1
1 -
2
-
3
-
4
-
5
-
6
-
7
-
8
-
9
-
10
-
11
-
12
-
13
-
14
-
15
-
16
-
 17
17 -
 18
18 -
 19
19 -
 20
20 -
 21
21 -
 22
22 -
 23
23 -
 24
24 -
 25
25 -
 26
26 -
 27
27 -
28
-
29
-
30
-
31
-
32
-
33
-
34
-
35
-
36
-
37
-
38
-
39
-
40
-
41
-
42
-
43
-
44
-
45
-
46
-
47
-
48
-
49
-
50
-
51
-
52
-
53
-
54
-
55
-
56
-
57
-
58
-
59
-
60
-
61
-
62
-
63
-
64
-
65
-
66
-
67
-
68
-
69
-
70
-
71
-
72
-
73
-
74
-
75
-
76
-
77
-
78
-
79
-
80
-
81
-
82
-
83
 |
 |
