Canon imageFORMULA DR-M140 Document Scanner User Manual - Page 39
Selecting a Job and Scanning, Click a job.
 |
View all Canon imageFORMULA DR-M140 Document Scanner manuals
Add to My Manuals
Save this manual to your list of manuals |
Page 39 highlights
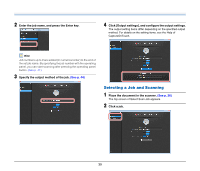
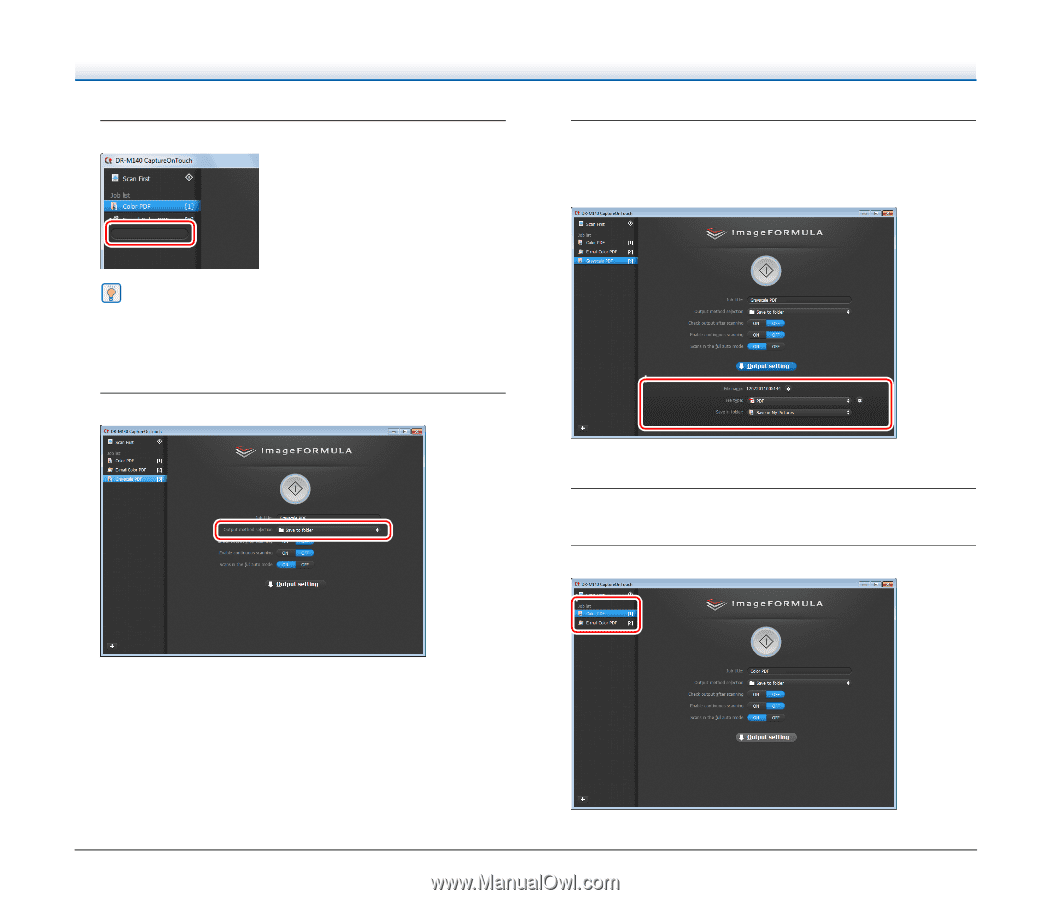
2 Enter the job name, and press the Enter key. 4 Click [Output settings], and configure the output settings. The output setting items differ depending on the specified output method. For details on the setting items, see the Help of CaptureOnTouch. Hint Job numbers up to 9 are added (in numerical order) to the end of the set job name. By specifying the job number with the operating panel, you can start scanning after pressing the operating panel button. (See p. 41) 3 Specify the output method of the job. (See p. 44) Selecting a Job and Scanning 1 Place the document in the scanner. (See p. 26) The top screen of Select Scan Job appears. 2 Click a job. 39
-
 1
1 -
2
-
3
-
4
-
5
-
6
-
7
-
8
-
9
-
10
-
11
-
12
-
13
-
14
-
15
-
16
-
17
-
18
-
19
-
20
-
21
-
22
-
23
-
24
-
25
-
26
-
27
-
28
-
29
-
30
-
31
-
32
-
33
-
 34
34 -
 35
35 -
 36
36 -
 37
37 -
 38
38 -
 39
39 -
 40
40 -
 41
41 -
 42
42 -
 43
43 -
 44
44 -
45
-
46
-
47
-
48
-
49
-
50
-
51
-
52
-
53
-
54
-
55
-
56
-
57
-
58
-
59
-
60
-
61
-
62
-
63
-
64
-
65
-
66
-
67
-
68
-
69
-
70
-
71
-
72
-
73
-
74
-
75
-
76
-
77
-
78
-
79
-
80
-
81
-
82
-
83
 |
 |
39
2
Enter the job name, and press the Enter key.
Hint
Job numbers up to 9 are added (in numerical order) to the end of
the set job name. By specifying the job number with the operating
panel, you can start scanning after pressing the operating panel
button.
(See p. 41)
3
Specify the output method of the job.
(See p. 44)
4
Click [Output settings], and configure the output settings.
The output setting items differ depending on the specified output
method. For details on the setting items, see the Help of
CaptureOnTouch.
Selecting a Job and Scanning
1
Place the document in the scanner.
(See p. 26)
The top screen of Select Scan Job appears.
2
Click a job.