Canon imageFORMULA DR-M140 Document Scanner User Manual - Page 41
Operating the scanner with the operating panel buttons
 |
View all Canon imageFORMULA DR-M140 Document Scanner manuals
Add to My Manuals
Save this manual to your list of manuals |
Page 41 highlights
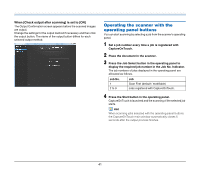
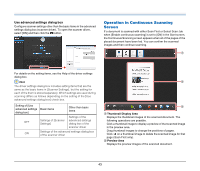
When [Check output after scanning] is set to [ON] The Output Confirmation screen appears before the scanned images are output. Change the settings for the output method if necessary and then click the output button. The name of the output button differs for each selected output method. Operating the scanner with the operating panel buttons You can start scanning by selecting a job from the scanner's operating panel. 1 Set a job number every time a job is registered with CaptureOnTouch. 2 Place the document in the scanner. 3 Press the Job Select button in the operating panel to display the required job number in the Job No. Indicator. The job numbers of jobs displayed in the operating panel are allocated as follows. Job No. 1 2 to 9 Job Scan First (default / modifiable) Jobs registered with CaptureOnTouch. 4 Press the Start button in the operating panel. CaptureOnTouch is launched and the scanning of the selected job starts. Hint When scanning jobs selected with the operating panel buttons, the CaptureOnTouch main window automatically closes 5 seconds after the output process finishes. 41
-
 1
1 -
2
-
3
-
4
-
5
-
6
-
7
-
8
-
9
-
10
-
11
-
12
-
13
-
14
-
15
-
16
-
17
-
18
-
19
-
20
-
21
-
22
-
23
-
24
-
25
-
26
-
27
-
28
-
29
-
30
-
31
-
32
-
33
-
34
-
35
-
 36
36 -
 37
37 -
 38
38 -
 39
39 -
 40
40 -
 41
41 -
 42
42 -
 43
43 -
 44
44 -
 45
45 -
 46
46 -
47
-
48
-
49
-
50
-
51
-
52
-
53
-
54
-
55
-
56
-
57
-
58
-
59
-
60
-
61
-
62
-
63
-
64
-
65
-
66
-
67
-
68
-
69
-
70
-
71
-
72
-
73
-
74
-
75
-
76
-
77
-
78
-
79
-
80
-
81
-
82
-
83
 |
 |
