Creative SB0060 User Guide - Page 16
Installing the Cards, and Related, Peripherals
 |
UPC - 494180250742
View all Creative SB0060 manuals
Add to My Manuals
Save this manual to your list of manuals |
Page 16 highlights
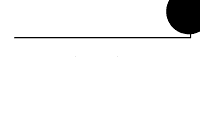
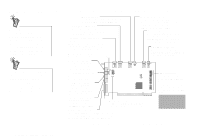
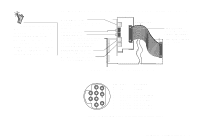
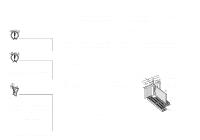
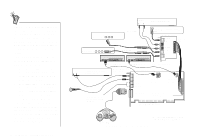
Installing the Cards and Related Peripherals Do not force the audio card into the slot. If it does not fit properly, gently remove it and try again. Make sure there is sufficient space between the Digital I/O card and the adjacent card (especially if it is an ISA card) such that the cards do not touch. 1. Switch off your system and all peripheral devices. 2. Touch a metal plate on your system to ground yourself and to discharge any static electricity, and then unplug the power cord from the wall outlet. 3. Remove the cover from your system. 4. Connect the Digital I/O card to the audio card using the Digital I/O cable, as shown in Figure 1-2. 5. Remove the metal plates from two unused PCI expansion slots in your system and put the screws aside, to be used later. If you have only one unused PCI expansion slot, then you must have at least an unused bracket on your computer casing to accommodate the PCIoriented Digital I/O card. 6. Align the Sound Blaster Live! card with the vacant PCI expansion slot. Press the card gently and evenly into the slot as shown. Ensure that the card sits firmly inside the PCI expansion slot. 7. Secure the card to the expansion slot with a screw. 8. Place the metal bracket of the Digital I/O card into an unused bracket on the computer casing. ii. Fasten the card to the slot with a screw. Unused brackets i. Gently press the audio card into the slot. The joystick connector on your audio card is identical to that on a standard PC game control adapter or the game I/O connector. You can connect any analog joystick with a 15-pin D-shell connector or any device compatible with the standard PC joystick. To use two joysticks, you need a Y-cable splitter. 1-4 Knowing and Installing Your Cards 9. Secure the card to the casing with a screw. PCI slot ISA slot Figure 1-4: Securing the audio card to the PCI expansion slot.
-
 1
1 -
2
-
3
-
4
-
5
-
6
-
7
-
8
-
9
-
10
-
 11
11 -
 12
12 -
 13
13 -
 14
14 -
 15
15 -
 16
16 -
 17
17 -
 18
18 -
 19
19 -
 20
20 -
 21
21 -
22
-
23
-
24
-
25
-
26
-
27
-
28
-
29
-
30
-
31
-
32
-
33
-
34
-
35
-
36
-
37
-
38
-
39
-
40
-
41
-
42
-
43
-
44
-
45
-
46
-
47
-
48
-
49
-
50
-
51
-
52
-
53
-
54
-
55
-
56
-
57
-
58
-
59
-
60
-
61
-
62
-
63
-
64
-
65
-
66
-
67
-
68
-
69
-
70
-
71
-
72
-
73
-
74
-
75
-
76
-
77
-
78
-
79
-
80
-
81
-
82
-
83
-
84
-
85
-
86
-
87
-
88
-
89
-
90
-
91
-
92
-
93
-
94
-
95
-
96
-
97
-
98
-
99
-
100
-
101
-
102
 |
 |