Cub Cadet CC30H Riding Lawn Mower Operation Manual - Page 23
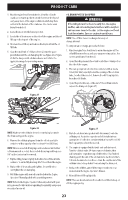
Rotate Counter-clockwise to open, Closed, Clear Oil Drain Tube
 |
View all Cub Cadet CC30H Riding Lawn Mower manuals
Add to My Manuals
Save this manual to your list of manuals |
Page 23 highlights
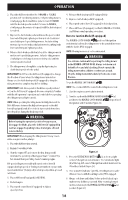
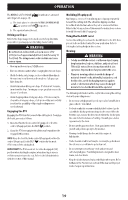
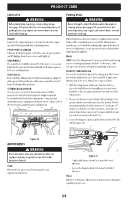
PRODUCT CARE 1. Run the engine for a few minutes to allow the oil in the crankcase to warm up. Warm oil will flow more freely and carry away more of the engine sediment which may have settled at the bottom of the crankcase. Use care to avoid burns from hot oil. 2. Lower the deck into the lowest position. 3. Locate the oil drain valve on the side of the engine and the oil fill cap on the topside of the engine. 4. Unscrew the oil fill cap and remove the dipstick from the oil fill tube. 5. Snap the small end of oil drain sleeve (a) onto the space provided around the oil drain plug (b). See Figure 25 or Figure 26 for the two possible oil drain sleeves and refer to the applicable image for your riding mower. b a Figure 25 OIL DRAIN PORT (IF EQUIPPED) WARNING If the riding mower has been recently run, the engine, muffler, and surrounding metal surfaces will be very hot and can cause burns to the skin. Let the engine cool for at least five minutes. Exercise caution to avoid burns. NOTE: The oil filter should be changed at every oil change interval. To complete an oil change, proceed as follows: 1. Run the engine for a short time to warm the engine oil. The oil will flow more freely and carry away more impurities. Use care to avoid burns from hot oil. 2. Open the riding mower's hood and locate the oil drain port on the side of the engine. 3. Place an appropriate oil collection container with at least a 64 oz (1.82 liter) capacity below the opening of the oil drain tube, to collect the used oil. Remove the oil fill cap/dipstick from the oil fill tube. 4. Open the protective cap on the end of the oil drain valve to expose the drain port (Figure 27). Rotate Counter-clockwise to open b a Clear Oil Drain Tube Open Closed Figure 26 NOTE: Make sure the oil drain sleeve is securely in place under the drain casting on the engine. 6. Remove the oil drain plug and drain the oil into a suitable container with a capacity of no less than 64 oz (1.82 liter). NOTE: Non-recessed oil drain plugs can be removed with either a 10 mm wrench or socket. Recessed oil drain plugs will require a 3/8" ratchet extension for removal. 7. Tip the riding mower slightly in the direction of the suitable container to aid in fully draining all of the oil from the engine. 8. Replace the oil drain plug and tighten. Be careful not to overtighten the oil drain plug. 9. Refill the engine with new oil as instructed in the Engine Operator's Manual packed with your riding mower. NOTE: Refer to the Engine Operator's Manual packed with your riding mower for information regarding the quantity and proper viscosity of motor oil. Figure 27 5. Push the oil drain tube (packed with this manual) onto the oil drain port. Route the opposite end of the tube into an appropriate oil collection container with at least a 64 oz (1.82 liter) capacity to collect the used oil. 6. The engine is equipped with a twist-and-pull drain port. Turn the oil drain valve 1⁄4-turn counter-clockwise, then pull outward to begin draining oil. After the oil has finished draining, push the end of the oil drain valve back in and turn 1⁄4-turn clockwise to close the oil drain. Re-cap the end of the oil drain valve to keep debris from entering the drain port. 7. Replace the oil filter, and refill the engine with new oil as instructed in the Engine Operator's Manual. 8. Reinstall the oil fill cap/dipstick. NOTE: Place an absorbent towel beneath the oil filter to keep oil off the engine pulley. 23
-
 1
1 -
2
-
3
-
4
-
5
-
6
-
7
-
8
-
9
-
10
-
11
-
12
-
13
-
14
-
15
-
16
-
17
-
 18
18 -
 19
19 -
 20
20 -
 21
21 -
 22
22 -
 23
23 -
 24
24 -
 25
25 -
 26
26 -
 27
27 -
 28
28 -
29
-
30
-
31
-
32
-
33
-
34
-
35
-
36
-
37
-
38
-
39
-
40
-
41
-
42
-
43
-
44
-
45
-
46
-
47
-
48
-
49
-
50
-
51
-
52
-
53
-
54
-
55
-
56
-
57
-
58
-
59
-
60
-
61
-
62
-
63
-
64
-
65
-
66
-
67
-
68
-
69
-
70
-
71
-
72
-
73
-
74
-
75
-
76
-
77
-
78
-
79
-
80
-
81
-
82
-
83
-
84
-
85
-
86
-
87
-
88
-
89
-
90
-
91
-
92
-
93
-
94
-
95
-
96
 |
 |