Cub Cadet CC30H Riding Lawn Mower Operation Manual - Page 28
Caution, Warning
 |
View all Cub Cadet CC30H Riding Lawn Mower manuals
Add to My Manuals
Save this manual to your list of manuals |
Page 28 highlights
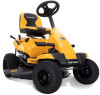
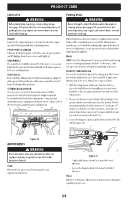
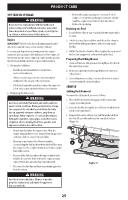
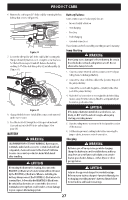
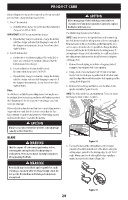
PRODUCT CARE If your riding mower has not been put into use for an extended period of time, charge the battery as follows: 1. For 30" deck models: a. An AGM battery charger should be used. Recommended charge rate is 1.1A to 14.8V. IMPORTANT! Do NOT use an automotive charger. b. If your battery charger is automatic, charge the battery until the charger indicates that charging is complete. If the charger is not automatic, charge for no fewer than eight (8) hours. 2. For 24" deck models: a. A voltmeter or load tester reading of 12.4 volts (DC) or lower across the battery terminals indicates that the battery needs to be charged. b. A lead-acid battery charger should be used. Recommended charge rate is 1A/14.7V. c. If your battery charger is automatic, charge the battery until the charger indicates that charging is complete. If the charger is not automatic, charge for no fewer than eight (8) hours. Fuse One 5A fuse is installed in your riding mower's wiring harness located just above the battery, under the left fender, to protect the riding mower's electrical system from damage caused by excessive amperage. If the electrical system does not function or your riding mower's engine will not crank, first check to be certain that the fuse has not blown. It can be found at the rear of the riding mower, underneath the fender located by the battery. CAUTION Always use a replacement fuse with the same amperage capacity as the blown fuse. BLADE WARNING Shut the engine off and remove ignition key before removing the cutting blade(s) for sharpening or replacement. Protect your hands by using heavy gloves when grasping the blade. WARNING Periodically inspect the blade and/or spindle for cracks or damage, especially after striking a foreign object. Do not operate the machine until damaged components are replaced. CAUTION If the cutting edge of the blade has previously been sharpened or if any metal separation is present, replace the blades with new ones. The blade(s) may be removed as follows: NOTE: It may be easier to change the blade by first removing the deck from beneath the riding mower, (refer to Cutting Deck Removal earlier in this section) then gently flipping the deck over to expose its underside. It is possible to change the blade, however, with the deck still attached to the riding mower. If attempting to change the blade with the deck still installed on the riding mower, first move the deck lift lever to its highest cutting position. 1. Remove the mulch plug, deck chute or bagging chute, if equipped, exposing the deck chute opening. 2. Using a block of wood at least 2" x 4" (51 mm x 102 mm), insert it into the deck opening and rotate the blade around until it wedges the wood between the deck opening and the cutting blade (Figure 38). 3. Remove the hex flange nut that secures the blade to the spindle assembly (Figure 38 inset). NOTE: The deck spindle has a normal thread. To loosen, rotate the flange lock nut counter-clockwise. Figure 38 4. To properly sharpen the cutting blades, remove equal amounts of metal from both ends of the blades along the cutting edges, parallel to the trailing edge, at a 25° to 30° angle. Always grind each cutting blade edge equally to maintain proper blade balance (Figure 39). Figure 39 28
-
 1
1 -
2
-
3
-
4
-
5
-
6
-
7
-
8
-
9
-
10
-
11
-
12
-
13
-
14
-
15
-
16
-
17
-
18
-
19
-
20
-
21
-
22
-
 23
23 -
 24
24 -
 25
25 -
 26
26 -
 27
27 -
 28
28 -
 29
29 -
 30
30 -
 31
31 -
 32
32 -
 33
33 -
34
-
35
-
36
-
37
-
38
-
39
-
40
-
41
-
42
-
43
-
44
-
45
-
46
-
47
-
48
-
49
-
50
-
51
-
52
-
53
-
54
-
55
-
56
-
57
-
58
-
59
-
60
-
61
-
62
-
63
-
64
-
65
-
66
-
67
-
68
-
69
-
70
-
71
-
72
-
73
-
74
-
75
-
76
-
77
-
78
-
79
-
80
-
81
-
82
-
83
-
84
-
85
-
86
-
87
-
88
-
89
-
90
-
91
-
92
-
93
-
94
-
95
-
96
 |
 |