DELPHI TNR800 User Guide
DELPHI TNR800 - Navigation System With DVD-ROM Manual
 |
View all DELPHI TNR800 manuals
Add to My Manuals
Save this manual to your list of manuals |
DELPHI TNR800 manual content summary:
- DELPHI TNR800 | User Guide - Page 1
- DELPHI TNR800 | User Guide - Page 2
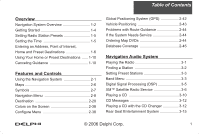
Using the Navigation System 2-1 Maps 2-6 Symbols 2-7 Navigation Menu 2-8 Destination 2-20 Colors on the Screen 2-38 Configure Menu 2-38 Global Positioning System (GPS 2-42 Vehicle Positioning 2-43 Problems with Route Guidance 2-44 If the System Needs Service 2-44 Ordering Map DVDs - DELPHI TNR800 | User Guide - Page 3
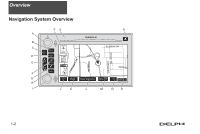
Overview Navigation System Overview 1-2 - DELPHI TNR800 | User Guide - Page 4
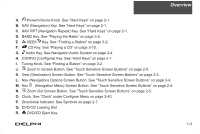
M. Nav (Navigation Menu) Screen Button. See "Touch Sensitive Screen Buttons" on page 2-4. N. Zoom Out Screen Button. See "Touch Sensitive Screen Buttons" on page 2-5. O. Clock. See "Clock" under Configure Menu on page 2-40. P. Directional Indicator. See Symbols on page 2-7. Q. DVD/CD Loading - DELPHI TNR800 | User Guide - Page 5
the navigation system, read this manual thoroughly to become familiar with it and to understand how the system works. The navigation system allows you to do the following: • Plan a route with provided turn-by-turn route and map guidance with voice prompts. • Select a destination using various - DELPHI TNR800 | User Guide - Page 6
Clock screen button. 4. Touch the appropriate Time Zone screen button. 5. Touch the Daylight Savings screen button (when applicable). The time is now set. Touch the Manual Adjust screen button if you need to further adjust the time. The radio will use the GPS satellite to set the time. The vehicle - DELPHI TNR800 | User Guide - Page 7
and navigation system on. 2. Insert the DVD map disc into the radio CD slot. 3. A notice may appear. Touch the NEXT screen button to proceed. If the radio is already on with a map disc inserted, push the NAV hard key. 4. Touch the DEST screen button. 5. Touch the Change screen button. 6. Touch the - DELPHI TNR800 | User Guide - Page 8
to turn the audio and navigation system on. 2. Insert the DVD map disc into the radio CD slot. 3. A notice may appear. Touch the NEXT screen button to proceed. If the radio is already on with a map disc inserted, push the NAV hard key. 4. Touch the DEST screen button located in the lower left - DELPHI TNR800 | User Guide - Page 9
knob to turn the audio and navigation system on. 2. Insert the DVD map disc into the radio CD slot. 3. A notice may appear. Touch the NEXT screen button to proceed. If the radio is already on with a map disc inserted, push the NAV hard key. 4. Touch the DEST screen button located in the lower left - DELPHI TNR800 | User Guide - Page 10
system on. 2. Insert the DVD map disc into the radio CD slot. A notice may appear. Touch the NEXT screen button to proceed. If the radio is already on with a map disc inserted, push the NAV hard key. 3. Touch the Nav (navigation) menu screen button. 4. Touch the Memory Points screen button. 5. Touch - DELPHI TNR800 | User Guide - Page 11
Overview Using Your Home or Preset Destinations These destinations are available for selection while driving: 1. Press the power/volume knob to turn the audio and navigation system on. 2. Insert the DVD map disc into the radio CD slot. 3. Touch the DEST screen button. 4. Touch the (Home symbol) or - DELPHI TNR800 | User Guide - Page 12
variety of topics. See Navigation Menu on page 2-8 for more information. Use the keys located to the left of the navigation screen along with the available touch-sensitive screen buttons on the navigation screen to operate the system. Once the vehicle is moving, various functions will be disabled to - DELPHI TNR800 | User Guide - Page 13
Features and Controls Hard Keys (continued) NAV (Navigation): If you are in a menu and are not on the map screen, press the NAV key to view the map showing current vehicle position. If a route has not been planned, pressing this key will display the map screen and the following information: • North - DELPHI TNR800 | User Guide - Page 14
next or previous radio station and stay there. See "Finding a Station" on page 3-2. (CD): Press the CD key to play a CD. The CD screen will be displayed. See "Playing a CD" on page 3-10. (Audio): Press the audio key to access the Audio menu. See Navigation Audio System on page 3-4. CONFIG (Configure - DELPHI TNR800 | User Guide - Page 15
frequently at the bottom of a map screen. Dest (Destination): Touch this screen button to display the Destination menu. See Destination on page 2-20 for more information. Nav (Navigation) Options: Touch this screen button to display the Nav Options menu. See "Navigation Options" on page 2-35 for - DELPHI TNR800 | User Guide - Page 16
your highlighted route. Clock: Touch the clock screen button when the radio is on to display the date. FM1 Audio Source: Touch the audio source information while a map screen is displayed to bring up the 95.5 MHz Audio screen. Back: Touch this screen button when available on a menu to return to the - DELPHI TNR800 | User Guide - Page 17
to the "Navigation System Map Disc" manual to view the explanation of map coverage. The map disc manual will be in your map DVD case. To install the DVD map: 1. Turn the ignition on. 2. Load the map DVD into the slot by inserting it partway. The system will pull it in. Once the map DVD is inserted - DELPHI TNR800 | User Guide - Page 18
indicates that The following symbols are the most common that appear on a map screen. the map is shown with North up, known as North Up mode. Your vehicle is shown as this symbol. It indicates the current position of your vehicle on the map. While in North Up mode, North will always be at the - DELPHI TNR800 | User Guide - Page 19
Navigation Menu Nav (Navigation Menu): Touch the navigation menu symbol screen button at the bottom of the map screen to access the main navigation menu. The main navigation menu allows you to choose from a list of options and to use the available touch screen buttons to make system adjustments - DELPHI TNR800 | User Guide - Page 20
are also displayed. Map Appearance Selecting the Map Appearance screen button allows you to adjust the appearance of a map based on your preferences. This menu is divided into three sections: Map Orient (orientation), Guidance Mode, and Map Mode. Touch an option's screen button to select it. The - DELPHI TNR800 | User Guide - Page 21
your current position, with the calculated route highlighted. Single: This feature allows one map to be displayed. Split Screen: This feature allows two maps to be displayed, which can be independently adjusted in both scale and map orientation. For more information on the symbols that can appear on - DELPHI TNR800 | User Guide - Page 22
points where you need to maneuver your vehicle, such as an intersection. To adjust the volume of the voice prompts you receive from the system, do the following: 1. Touch the Voice Volume screen button. 2. Touch the plus (+) or minus (-) sign screen buttons to increase or decrease the volume. The - DELPHI TNR800 | User Guide - Page 23
you wish to use or avoid. Destination: This feature allows you to add, reorder, or delete destinations. Set Preferred Road: This feature allows you to add, modify, or delete road preference settings. Route Overview: Touch this screen button to access the Route Overview menu. See "Route Overview - DELPHI TNR800 | User Guide - Page 24
the map screen with the route highlighted. The route is traced by the vehicle symbol as you travel. You can preview the route from the starting position to the final destination by touching the arrow screen buttons inside the Route Preview pop-up menu. Info (Information): Touch the Info screen button - DELPHI TNR800 | User Guide - Page 25
route to the next POI. Use the following arrow screen buttons from the Route Preview pop-up menu to trace a route: (Preview to current location): Touch this screen button to preview the route traveling toward the vehicle's current location. Touch this screen button repeatedly to increase the speed - DELPHI TNR800 | User Guide - Page 26
Features and Controls Navigation Setup Selecting the Nav Setup screen button will display the Nav Setup menu. From this menu, several options may be selected, adjusted, or turned on and off. Touch the up or down arrow screen buttons to the left of the menu options to scroll through the list. The - DELPHI TNR800 | User Guide - Page 27
touch the Back screen button to return to the Nav Setup menu. Auto Reroute: With this feature on, the navigation system will automatically recalculate a route if you drive off course. You may also choose to turn this feature off. Voice Guide in All Mode: Touch the On screen button to hear navigation - DELPHI TNR800 | User Guide - Page 28
vehicle has been relocated a great distance. Touch the Yes screen button to calibrate the system, or the No screen button to leave the calibration as it is. Select Defaults?: This feature allows you to restore all available factory default settings in the Nav Setup menu. Touch the Yes screen button - DELPHI TNR800 | User Guide - Page 29
Controls Memory Points Touching the Memory Points screen button will display the Memory Points menu. This menu contains options for and Emergency are the only destination selections available from the Destination menu while the vehicle is moving. These presets are shown as the home symbol - DELPHI TNR800 | User Guide - Page 30
. You will be asked to confirm your decision. Touch the Yes screen button to delete the destination or touch the No screen button to cancel the deletion. You may also touch the Del. All screen button from the Delete Previous Dest screen to delete all previous destinations listed. You will be asked - DELPHI TNR800 | User Guide - Page 31
Features and Controls Destination The Destination menu will give you several ways to plan a route by entering destination points. Touch Dest at the bottom of the map screen to display the Destination menu. Destination Button 2-20 - DELPHI TNR800 | User Guide - Page 32
, review the search area map on the right side of the menu to make sure your destination is located in the highlighted region. Change: If you need to see a more detailed search area map with a list of states, or to change the search area, touch the Change screen button. The Search Area screen will - DELPHI TNR800 | User Guide - Page 33
while the vehicle is moving. Alpha-Numeric Keypad Letters of the alphabet, symbols, punctuation, and numbers, when available to you, will be displayed on the navigation screen as an alpha or numeric keypad. The appropriate keypad will automatically be displayed whenever the system needs information - DELPHI TNR800 | User Guide - Page 34
to reach the numeric keypad. (Space): Touch this screen button to enter a space between characters or the words of a name. (Backspace): Touch this screen button if you have selected an incorrect character. To make your name selections easier, the system will only allow you to select a character - DELPHI TNR800 | User Guide - Page 35
system with a house number, street name, and city. If you know the city where the address is located, touch the City screen button. The City screen the city. Touch the Input City Name screen button and enter in the city using the alpha keypad. Use the same city name that you would use when mailing a - DELPHI TNR800 | User Guide - Page 36
the street name has been selected, enter the house number using the numeric keypad. The system will list the house number range that is available for the street. When you have finished entering the house number, touch the OK screen button. If the address number exists on more than one street that - DELPHI TNR800 | User Guide - Page 37
choosing the Category option. Select a category from the list the system will supply. If the list of available POIs for the category selected is still too long, you may need to input the name or city for the POI. • Touch the City screen button and type in the city you wish to select a POI - DELPHI TNR800 | User Guide - Page 38
a memory point, you will be able to select an icon to correspond with that memory point. You will be given a screen with several icons to choose from. You can also choose to register that memory point by using a sound, which you select. To choose a sound, touch the With Sound screen button. 2-27 - DELPHI TNR800 | User Guide - Page 39
allows you to select a destination by choosing from a list of previously entered destinations. Touch the number next to the desired previous destination to select it. Emergency The Emergency 5, Emergency is the only destination entry method available for selection while the vehicle is moving. 2-28 - DELPHI TNR800 | User Guide - Page 40
the Route screen button and then the Start screen button. You may also zoom out to view the entire regional map. See "Touch-Sensitive Screen Buttons" on page 2-5 for more information. However, if you zoom out as much as possible and scroll around the map, some parts of the map will appear to be - DELPHI TNR800 | User Guide - Page 41
touch the OK screen button. The destination location will then be displayed. Most phone numbers for POIs included in the DVD to travel to. To enter a destination using this method, enter the name of the be entered as Civic Center. The system will search for an entry exactly as you have entered - DELPHI TNR800 | User Guide - Page 42
may touch the Route screen button and then the Start screen button. Freeway Entrance/Exit The Freeway Entrance/Exit destination entry method allows you to select a destination by entering a freeway entrance or exit point. Enter Freeway names using - DELPHI TNR800 | User Guide - Page 43
is entered, a screen with the destination preview menu will appear. This screen will display a zoomed in view of the destination, as well as the following options: Enter Destination: Touch this screen button to enter the current destination as the only destination in the system. The route will - DELPHI TNR800 | User Guide - Page 44
Once you have entered your destination by touching the Enter Destination screen button, you can do one of the following: • Press the NAV hard key to begin route guidance. • Start driving to begin route guidance. • Touch the Route screen button on the map screen displaying the new destination to make - DELPHI TNR800 | User Guide - Page 45
Each time a destination has been selected and entered, the route overview menu can be displayed by touching the Route screen button on the map screen. The following three options will be displayed: Start: This option will choose the current highlighted route, and begin route guidance. 3 Routes: This - DELPHI TNR800 | User Guide - Page 46
Features and Controls Navigation Options Once you select a destination and begin your route, you can touch the Nav Options screen button at the bottom of the map screen to view a menu with additional route options. Choose from the following route options: POI Icon Off: This option allows you to turn - DELPHI TNR800 | User Guide - Page 47
destination. The second programmed destination will then be used if one is available. Change Route: This option allows you to change the route search condition while the vehicle is moving. The following options may be available: • Detour for 1 mile?: Touch the Yes screen button to recalculate your - DELPHI TNR800 | User Guide - Page 48
, this option allows you to adjust options for the screen to the right. If the position on the map is away from the current vehicle position and you touch the Nav Options screen button, you will only have the following four options: POI Icon Off: This option allows you to turn off Point of Interest - DELPHI TNR800 | User Guide - Page 49
the CONFIG hard key located to the left of the navigation screen to access the Configure menu. See Navigation System Overview on page 1-2 for more information. Contrast/Brightness To adjust the contrast or brightness of the navigation screen, touch the plus (+) or minus (-) sign screen buttons to - DELPHI TNR800 | User Guide - Page 50
every time a key is pressed on the navigation system. Touch the Off screen button if you do not want to hear a beep whenever a key is pressed. Vehicle Chime This feature allows you to adjust the chime volume level in your vehicle. Touch the Normal screen button for normal chime volume or the Loud - DELPHI TNR800 | User Guide - Page 51
for all instructional text and voice prompts. However, names on the map when using the navigation functions will not change. If you wish to change the language, the map DVD must be inserted. Then, do the following: 1. Touch the Language screen button. A caution will display. 2. Touch the desired - DELPHI TNR800 | User Guide - Page 52
in standard or military time. Touch the 12Hr screen button for standard time or the 24Hr screen button for military time. Auto GPS Update: With this feature on, the navigation system time will be set to match the current GPS time. The time will be updated with the GPS time when the ignition is - DELPHI TNR800 | User Guide - Page 53
Features and Controls Global Positioning System (GPS) The navigation system determines the position of your vehicle by using satellite signals, various vehicle signals and map data. The Global Positioning System (GPS) locates the current position of your vehicle using signals sent by the United - DELPHI TNR800 | User Guide - Page 54
, the position of the vehicle on the map may be inaccurate due to one or more of the following reasons: • The road system has changed. • The vehicle is being driven on winding roads or on a long straight road. • The vehicle is approaching a tall building or a large vehicle. • The surface streets run - DELPHI TNR800 | User Guide - Page 55
listed on the DVD. The route to the destination may not be shown. See Ordering Map DVDs below If the System Needs Service Return to the point of installation or contact Delphi Customer Service at 877-667-8700. Ordering Map DVDs Go to www.shopdelphi.com or contact Delphi Customer Service at 877-667 - DELPHI TNR800 | User Guide - Page 56
Coverage areas vary with respect to the level of map detail available for any given area. Some areas will feature greater levels of detail than others. If this happens, it does not mean there is a problem with the system. As the map DVD is updated, more detail may become available for areas which - DELPHI TNR800 | User Guide - Page 57
NOTES: Features and Controls 2-46 - DELPHI TNR800 | User Guide - Page 58
(RAP)" in Section 2 of your vehicle's owner manual for more information. The audio system is operated using navigation system menus. The audio menus are explained in this section. Playing the Radio (Power/Volume): Press this knob to turn the audio and navigation systems on and off. Turn the knob to - DELPHI TNR800 | User Guide - Page 59
Finding a Station BAND: Press this hard key to access the BAND screen and to switch between AM, FM1, FM2, XM1, and XM2, if equipped. Tuning Knob: Use the tuning knob on the lower left corner of the navigation system to choose a radio TUNE station. SEEK : Press the SEEK up or the down arrow to go - DELPHI TNR800 | User Guide - Page 60
you hear a beep. Whenever you press that screen button while in that band menu, the station you set will return. 5. Repeat the steps for each preset and source. Band Menu If the radio is on while the navigation system is not in use, this band menu will display the current audio information, as well - DELPHI TNR800 | User Guide - Page 61
drive. Use the down arrow screen button to get to the second page of the Audio menu. Touch the On screen button to turn this feature on. The volume level should always sound the same to you as you drive. You may also touch the Off screen button to turn this feature off. 3-4 Navigation Audio System - DELPHI TNR800 | User Guide - Page 62
Navigation Audio System Digital Signal Processing (DSP) If your vehicle is equipped with DSP, you have a choice of four different listening experiences. DSP can be used while listening to the audio system or the CD player. You can choose from the following DSP settings: Normal: Touch this screen - DELPHI TNR800 | User Guide - Page 63
appear on the display instead of the frequency. Touch the Info screen button on the band menu to receive information the selected radio station is currently broadcasting. XM™ Satellite Radio Service (if vehicle is equipped) XM™ is a satellite radio service that is based in the 48 contiguous United - DELPHI TNR800 | User Guide - Page 64
Navigation Audio System XM™ Options (if equipped) Touch the XM Options screen button to access the XM Options menu. This menu allows you to seek or scan for stations based on their category. Touch the On screen button next to XM Info Timeout to hide XM™ information after a certain amount of time has - DELPHI TNR800 | User Guide - Page 65
at a customer's request by calling 1-800-852-XMXM (9696). Updating encryption code The encryption code in your receiver is being updated, and no action is required. This process should take less than 30 seconds. Loss of signal Your system is functioning correctly, but you are in a location - DELPHI TNR800 | User Guide - Page 66
dealer. failure) Hardware failure If this message does not clear within a short period of time, your receiver may have a fault. Consult your retail location. See "Radio Reception" and "XM™ Satellite Radio Antenna System" in Section 3 of your vehicle's owner manual for more information. 3-9 - DELPHI TNR800 | User Guide - Page 67
. The system will not play MP3 formatted CDs. While playing a CD in the CD player, the navigation system is not available. A message will display if the NAV key is pressed. If your vehicle is equipped with Rear Seat Entertainment (RSE), you can play an audio CD while using the navigation system. See - DELPHI TNR800 | User Guide - Page 68
Navigation Audio System Repeat: Touch this screen button to repeat the track that is currently being played. Touch it again to turn this feature off. (Forward): Touch this screen button to advance quickly within a track. As the CD more to enter CD TRACK SCAN mode. A track on the disc will be played - DELPHI TNR800 | User Guide - Page 69
point of installation. If your radio displays an error message, write it down and provide it to your point of installation when reporting the problem. See "Rear Seat Audio (RSA)", "Care of Your CDs and DVDs", and "Care of Your CD and DVD Player" in Section 3 of your vehicle's owner manual for more - DELPHI TNR800 | User Guide - Page 70
Navigation Audio System Random: Touch the Random screen button for less than two seconds to play the tracks on the current disc in random, rather than sequential, order. Touch it again to turn off random play. When Random is touched for more than two seconds, the player selects D. Random mode. The - DELPHI TNR800 | User Guide - Page 71
Navigation Audio System Track Scan: To use this function, press and hold the SEEK key for at least two seconds, but less than four seconds, at which time a single chime will sound to alert you that the CD changer has entered TRACK SCAN mode for the current CD. While TRACK SCAN is active, the first 10 - DELPHI TNR800 | User Guide - Page 72
through all of the vehicle's speakers. From the RSE screen you can mute the Front or Rear speakers, mute RSE entirely, or turn off RSE. RSE Messages CD ERROR: If this message appears on the navigation screen, the DVD or CD is not being read by the system. The DVD or CD could be dirty, scratched - DELPHI TNR800 | User Guide - Page 73
of your vehicle's owner manual for more information. NO DISC: If this message appears on the navigation screen, the DVD slot is empty. Insert a DVD or CD. The DVD or CD should play. See "Rear Seat Entertainment System", "Rear Seat Audio (RSA)", "DVD Distortion", "Care of Your CDs and DVDs", "Care of - DELPHI TNR800 | User Guide - Page 74
Map DVDs 2-44 P Problems with Route Guidance 2-44 R Radio 3-1 Rear Seat Entertainment System .........3-15 Getting Started, Navigation 1-4 S Global Positioning System (GPS) ........2-42 Symbols 2-7 M System Overview, Navigation System 1-2 Maps 2-6 System Needs Service, If 2-44 Menu - DELPHI TNR800 | User Guide - Page 75
-
 1
1 -
 2
2 -
 3
3 -
 4
4 -
 5
5 -
 6
6 -
 7
7 -
8
-
9
-
10
-
11
-
12
-
13
-
14
-
15
-
16
-
17
-
18
-
19
-
20
-
21
-
22
-
23
-
24
-
25
-
26
-
27
-
28
-
29
-
30
-
31
-
32
-
33
-
34
-
35
-
36
-
37
-
38
-
39
-
40
-
41
-
42
-
43
-
44
-
45
-
46
-
47
-
48
-
49
-
50
-
51
-
52
-
53
-
54
-
55
-
56
-
57
-
58
-
59
-
60
-
61
-
62
-
63
-
64
-
65
-
66
-
67
-
68
-
69
-
70
-
71
-
72
-
73
-
74
-
75
 |
 |
