Dell Dimension 2010 Service Manual - Page 53
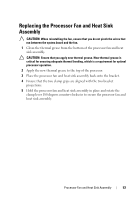
Replacing the Processor Fan and Heat Sink Assembly
 |
View all Dell Dimension 2010 manuals
Add to My Manuals
Save this manual to your list of manuals |
Page 53 highlights
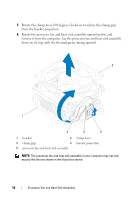
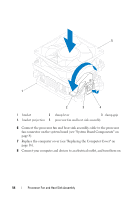
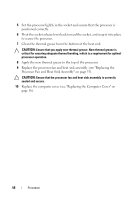
Replacing the Processor Fan and Heat Sink Assembly CAUTION: When reinstalling the fan, ensure that you do not pinch the wires that run between the system board and the fan. 1 Clean the thermal grease from the bottom of the processor fan and heat sink assembly. CAUTION: Ensure that you apply new thermal grease. New thermal grease is critical for ensuring adequate thermal bonding, which is a requirement for optimal processor operation. 2 Apply the new thermal grease to the top of the processor. 3 Place the processor fan and heat sink assembly back onto the bracket. 4 Ensure that the two clamp grips are aligned with the two bracket projections. 5 Hold the processor fan and heat sink assembly in place and rotate the clamp lever 180 degrees counter-clockwise to secure the processor fan and heat sink assembly. Processor Fan and Heat Sink Assembly 53
-
 1
1 -
2
-
3
-
4
-
5
-
6
-
7
-
8
-
9
-
10
-
11
-
12
-
13
-
14
-
15
-
16
-
17
-
18
-
19
-
20
-
21
-
22
-
23
-
24
-
25
-
26
-
27
-
28
-
29
-
30
-
31
-
32
-
33
-
34
-
35
-
36
-
37
-
38
-
39
-
40
-
41
-
42
-
43
-
44
-
45
-
46
-
47
-
 48
48 -
 49
49 -
 50
50 -
 51
51 -
 52
52 -
 53
53 -
 54
54 -
 55
55 -
 56
56 -
 57
57 -
 58
58 -
59
-
60
-
61
-
62
-
63
-
64
-
65
-
66
-
67
-
68
-
69
-
70
-
71
-
72
-
73
-
74
-
75
-
76
-
77
-
78
 |
 |