Dell Dimension 2010 Service Manual - Page 74
Changing Boot Sequence for the Current Boot, Boot Menu, USB Flash, Device, Boot Device Configuration
 |
View all Dell Dimension 2010 manuals
Add to My Manuals
Save this manual to your list of manuals |
Page 74 highlights
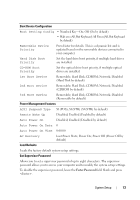
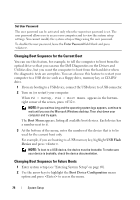
Set User Password The user password can be activated only when the supervisor password is set. The user password allows you to access your computer and to view the system setup settings. You cannot modify the system setup settings using the user password. To disable the user password, leave the Enter Password field blank and press . Changing Boot Sequence for the Current Boot You can use this feature, for example, to tell the computer to boot from the optical drive so that you can run the Dell Diagnostics on the Drivers and Utilities disc, but you want the computer to boot from the hard drive when the diagnostic tests are complete. You can also use this feature to restart your computer to a USB device such as a floppy drive, memory key, or CD-RW drive. 1 If you are booting to a USB device, connect the USB device to a USB connector. 2 Turn on (or restart) your computer. When F2 = Setup, F12 = Boot Menu appears in the bottomright corner of the screen, press . NOTE: If you wait too long and the operating system logo appears, continue to wait until you see the Microsoft Windows desktop. Then shut down your computer and try again. The Boot Menu appears, listing all available boot devices. Each device has a number next to it. 3 At the bottom of the menu, enter the number of the device that is to be used for the current boot only. For example, if you are booting to a USB memory key, highlight USB Flash Device and press . NOTE: To boot to a USB device, the device must be bootable. To make sure your device is bootable, check the device documentation. Changing Boot Sequence for Future Boots 1 Enter system setup (see "Entering System Setup" on page 69). 2 Use the arrow keys to highlight the Boot Device Configuration menu option and press to access the menu. 74 System Setup
-
 1
1 -
2
-
3
-
4
-
5
-
6
-
7
-
8
-
9
-
10
-
11
-
12
-
13
-
14
-
15
-
16
-
17
-
18
-
19
-
20
-
21
-
22
-
23
-
24
-
25
-
26
-
27
-
28
-
29
-
30
-
31
-
32
-
33
-
34
-
35
-
36
-
37
-
38
-
39
-
40
-
41
-
42
-
43
-
44
-
45
-
46
-
47
-
48
-
49
-
50
-
51
-
52
-
53
-
54
-
55
-
56
-
57
-
58
-
59
-
60
-
61
-
62
-
63
-
64
-
65
-
66
-
67
-
68
-
 69
69 -
 70
70 -
 71
71 -
 72
72 -
 73
73 -
 74
74 -
 75
75 -
 76
76 -
 77
77 -
 78
78
 |
 |