Dell Equallogic PS4110X PS4110 Hardware Owners Manual - Page 14
Drive Installation Guidelines and Restrictions, Removing a 2.5-inch Drive
 |
View all Dell Equallogic PS4110X manuals
Add to My Manuals
Save this manual to your list of manuals |
Page 14 highlights
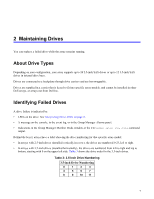
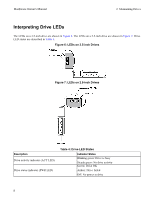
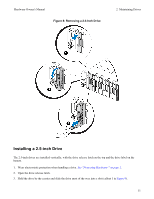
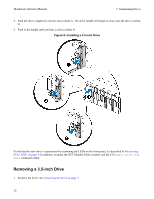
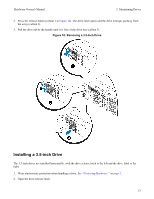
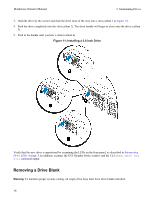
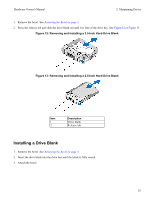
Hardware Owner's Manual 2 Maintaining Drives Drive Installation Guidelines and Restrictions • Replace a failed drive as soon as possible to provide the highest availability. • Install only drives of the same type, speed, and spin rate in an array. • Make sure the drive is oriented in the correct position for the array model. See Front-Panel Features and Indicators on page 3. • You can use drives of different capacities in the same array. However, the smallest drive in the array will determine how much space can be used on each drive. For example, if the smallest drive is 400GB, only 400GB of space will be available for use on each drive. • Make sure to insert a drive fully in the chassis before pushing in the handle. • When correctly installed, a drive will be flush with the front of the array. If the drive is protruding from the array, reinstall the drive. • After installation, make sure the drive power LED is green or flashing green. See Identifying Failed Drives on page 7. • There is a two-minute delay between the time you insert a drive and the time the drive is automatically configured into a RAID set. This time interval allows multiple drives to be simultaneously configured in an array, which is more efficient than installing a single drive, configuring it, and then repeating the process. For example, when you install a drive, the timer starts. If no other drives are installed, the drive is configured after a delay of two minutes. If you install another drive before two minutes have elapsed, the timer is restarted. • If you install a drive during RAID reconstruction or verification, the new drive will not be configured until the operation completes. Removing a 2.5-inch Drive 1. Remove the bezel. See Removing the Bezel on page 3. 2. Press the release button (callout 1 in Figure 8). The drive latch opens and the drive emerges partway from the array (callout 2). 3. Pull the drive out by the handle until it is free of the drive bay (callout 3). 10
-
 1
1 -
2
-
3
-
4
-
5
-
6
-
7
-
8
-
 9
9 -
 10
10 -
 11
11 -
 12
12 -
 13
13 -
 14
14 -
 15
15 -
 16
16 -
 17
17 -
 18
18 -
 19
19 -
20
-
21
-
22
-
23
-
24
-
25
-
26
-
27
-
28
-
29
-
30
-
31
-
32
-
33
-
34
-
35
-
36
-
37
-
38
-
39
-
40
-
41
-
42
-
43
-
44
-
45
-
46
-
47
-
48
 |
 |
