Dell Equallogic PS4110X PS4110 Hardware Owners Manual - Page 29
Control Module Replacement Procedures, Replacing the Secondary, Control Module
 |
View all Dell Equallogic PS4110X manuals
Add to My Manuals
Save this manual to your list of manuals |
Page 29 highlights
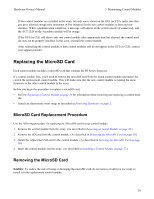
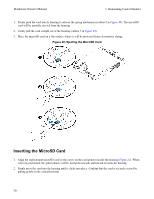
Hardware Owner's Manual 3 Maintaining Control Modules Control Module Replacement Procedures This section describes the procedures for removing and replacing one or both control modules in your PS Series array. The following replacement scenarios are covered: • Replacing the secondary control module in an array. • Replacing the active control module in an array. • Replacing both control modules in an array. Replacing the Secondary Control Module Use the following procedure to replace the secondary control module in the array: 1. Remove the control module from the array. (As described in Removing a Control Module on page 26.) 2. Remove the SD card from the control module. (As described in Removing the MicroSD Card on page 29.) 3. Install the SD card in the replacement control module. (As described in Inserting the MicroSD Card on page 30.) 4. Insert the replacement control module into the array. (As described in Installing a Control Module on page 27.) Replacing the Active Control Module Use one of following procedures to replace the active control module in the array: • One Controller Array: 1. Shut down the system with a full shutdown. (As described in Shutting Down and Restarting an Array on page 5.) 2. Replace the control module. (As described in Replacing the Secondary Control Module on page 25.) • Two Controller Array: 1. Use the "restart" command to make the active control module secondary. 2. Replace the control module that is now secondary (was active before the restart). (As described in Replacing the Secondary Control Module on page 25.) • Two Controller Array - One Controller Defective: 1. Replace the defective control module first, so the array has two good control modules. 2. Use the "restart" command to make the active control module secondary. 25
-
 1
1 -
2
-
3
-
4
-
5
-
6
-
7
-
8
-
9
-
10
-
11
-
12
-
13
-
14
-
15
-
16
-
17
-
18
-
19
-
20
-
21
-
22
-
23
-
 24
24 -
 25
25 -
 26
26 -
 27
27 -
 28
28 -
 29
29 -
 30
30 -
 31
31 -
 32
32 -
 33
33 -
 34
34 -
35
-
36
-
37
-
38
-
39
-
40
-
41
-
42
-
43
-
44
-
45
-
46
-
47
-
48
 |
 |
