Dell Equallogic PS4110X PS4110 Hardware Owners Manual - Page 19
Installing a Drive Blank, Removing and Installing a 3.5-Inch Hard-Drive Blank
 |
View all Dell Equallogic PS4110X manuals
Add to My Manuals
Save this manual to your list of manuals |
Page 19 highlights
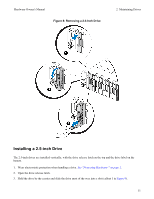
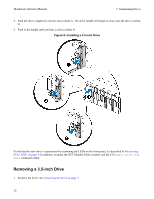
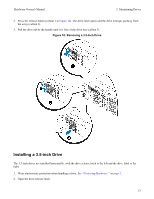
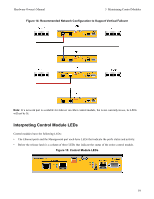
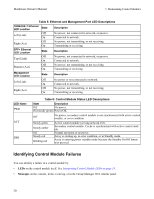
Hardware Owner's Manual 2 Maintaining Drives 1. Remove the bezel. See Removing the Bezel on page 3. 2. Press the release tab and slide the drive blank out until it is free of the drive bay. See Figure 12 or Figure 13. Figure 12: Removing and Installing a 3.5-Inch Hard-Drive Blank Figure 13: Removing and Installing a 2.5-Inch Hard-Drive Blank Item Description 1 Drive blank 2 Release tab Installing a Drive Blank 1. Remove the bezel. See Removing the Bezel on page 3. 2. Insert the drive blank into the drive bay until the blank is fully seated. 3. Attach the bezel. 15
-
 1
1 -
2
-
3
-
4
-
5
-
6
-
7
-
8
-
9
-
10
-
11
-
12
-
13
-
 14
14 -
 15
15 -
 16
16 -
 17
17 -
 18
18 -
 19
19 -
 20
20 -
 21
21 -
 22
22 -
 23
23 -
 24
24 -
25
-
26
-
27
-
28
-
29
-
30
-
31
-
32
-
33
-
34
-
35
-
36
-
37
-
38
-
39
-
40
-
41
-
42
-
43
-
44
-
45
-
46
-
47
-
48
 |
 |

Hardware Owner's Manual
2 Maintaining Drives
1.
Remove the bezel. See
Removing the Bezel on page 3
.
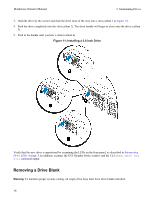
2.
Press the release tab and slide the drive blank out until it is free of the drive bay. See
Figure 12
or
Figure 13
.
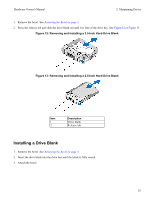
Figure 12: Removing and Installing a 3.5-Inch Hard-Drive Blank
Figure 13: Removing and Installing a 2.5-Inch Hard-Drive Blank
Item
Description
1
Drive blank
2
Release tab
Installing a Drive Blank
1.
Remove the bezel. See
Removing the Bezel on page 3
.
2.
Insert the drive blank into the drive bay until the blank is fully seated.
3. Attach the bezel.
15