Dell Equallogic PS4110X PS4110 Hardware Owners Manual - Page 17
Installing a 3.5-inch Drive, Removing a 3.5-Inch Drive
 |
View all Dell Equallogic PS4110X manuals
Add to My Manuals
Save this manual to your list of manuals |
Page 17 highlights
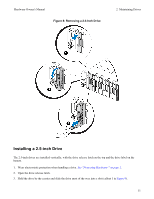
Hardware Owner's Manual 2 Maintaining Drives 2. Press the release button (callout 1 in Figure 10). The drive latch opens and the drive emerges partway from the array (callout 2). 3. Pull the drive out by the handle until it is free of the drive bay (callout 3). Figure 10: Removing a 3.5-Inch Drive Installing a 3.5-inch Drive The 3.5-inch drives are installed horizontally, with the drive release latch to the left and the drive label to the right. 1. Wear electrostatic protection when handling a drive. See "Protecting Hardware " on page 2. 2. Open the drive release latch. 13
-
 1
1 -
2
-
3
-
4
-
5
-
6
-
7
-
8
-
9
-
10
-
11
-
 12
12 -
 13
13 -
 14
14 -
 15
15 -
 16
16 -
 17
17 -
 18
18 -
 19
19 -
 20
20 -
 21
21 -
 22
22 -
23
-
24
-
25
-
26
-
27
-
28
-
29
-
30
-
31
-
32
-
33
-
34
-
35
-
36
-
37
-
38
-
39
-
40
-
41
-
42
-
43
-
44
-
45
-
46
-
47
-
48
 |
 |

Hardware Owner's Manual
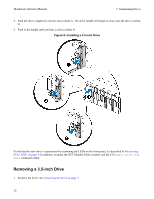
2 Maintaining Drives
2.
Press the release button (callout 1 in
Figure 10
). The drive latch opens and the drive emerges partway from
the array (callout 2).
3.
Pull the drive out by the handle until it is free of the drive bay (callout 3).
Figure 10: Removing a 3.5-Inch Drive
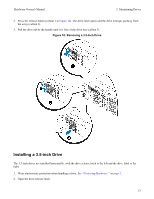
Installing a 3.5-inch Drive
The 3.5-inch drives are installed horizontally, with the drive release latch to the left and the drive label to the
right.
1.
Wear electrostatic protection when handling a drive.
See "Protecting Hardware " on page 2
.
2.
Open the drive release latch.
13