Dell Equallogic PS4110X PS4110 Hardware Owners Manual - Page 30
Removing a Control Module
 |
View all Dell Equallogic PS4110X manuals
Add to My Manuals
Save this manual to your list of manuals |
Page 30 highlights
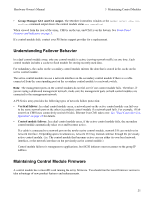
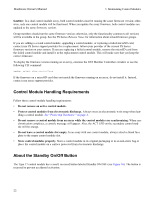
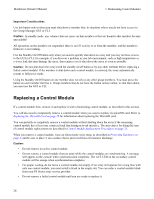
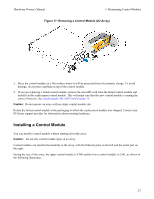
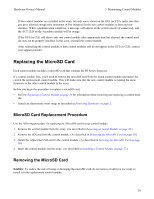
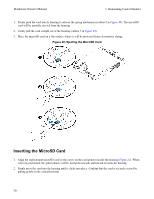
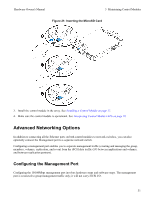
Hardware Owner's Manual 3 Maintaining Control Modules 3. Replace the control module that is now secondary (was active before the restart). (As described in Replacing the Secondary Control Module on page 25.) Replacing Both Control Modules Use the following procedure to replace both control modules in the array: 1. Replace the secondary control module first. (As described in Replacing the Secondary Control Module on page 25.) 2. Use the "restart" command to make the active control module secondary. 3. Replace the control module that is now secondary (was active before the restart). (As described in Replacing the Secondary Control Module on page 25.) Removing a Control Module Before removing a control module: • Review the information at the beginning of Replacing a Control Module on page 24. • Attach an electrostatic wrist strap. See "Protecting Hardware " on page 2. • Disconnect any serial or network cables attached to the control module. If there are open interface con- nectors on the other control module, re-attach the network cables to the other control module to provide uninterrupted data access. Caution: Do not remove an active control module. To remove a control module: 1. Push down on the orange release button (callout 1). 2. While holding the orange button (callout 1) down, swing the black release latch (callout 2) towards you. This starts to eject the control module from the array. Remove the control module. The following illustration provides an example of control module removal. 26
-
 1
1 -
2
-
3
-
4
-
5
-
6
-
7
-
8
-
9
-
10
-
11
-
12
-
13
-
14
-
15
-
16
-
17
-
18
-
19
-
20
-
21
-
22
-
23
-
24
-
 25
25 -
 26
26 -
 27
27 -
 28
28 -
 29
29 -
 30
30 -
 31
31 -
 32
32 -
 33
33 -
 34
34 -
 35
35 -
36
-
37
-
38
-
39
-
40
-
41
-
42
-
43
-
44
-
45
-
46
-
47
-
48
 |
 |
