Dell Equallogic PS4110X PS4110 Hardware Owners Manual - Page 7
Installing the Bezel, Front-Panel Features and Indicators, Removing the Bezel
 |
View all Dell Equallogic PS4110X manuals
Add to My Manuals
Save this manual to your list of manuals |
Page 7 highlights
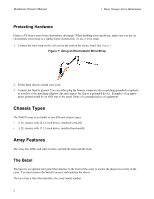
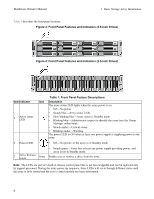
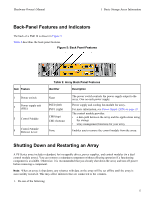
Hardware Owner's Manual 1 Basic Storage Array Information Removing the Bezel The steps for removing the bezel are the same for all array models. 1. Using the bezel key, unlock the bezel. 2. Holding the bezel, lift the latch on the left side of the bezel and swing the left side away from the array. 3. Lift the right side of the bezel off the right side of the array. 4. Set the bezel aside. Installing the Bezel The steps for installing the bezel are the same for all the array models. 1. Hook the right end of the bezel onto the right side of the chassis. 2. Swing the left end of the bezel towards the left side of the chassis. 3. Press the bezel into place until the release latch closes. 4. Using the key provided, lock the bezel and store the key in a safe place. Figure 2: Installing the Bezel Front-Panel Features and Indicators The front of a PS4110, without the bezel, is shown in Figure 3 and Figure 4. 3
-
 1
1 -
 2
2 -
 3
3 -
 4
4 -
 5
5 -
 6
6 -
 7
7 -
 8
8 -
 9
9 -
 10
10 -
 11
11 -
 12
12 -
13
-
14
-
15
-
16
-
17
-
18
-
19
-
20
-
21
-
22
-
23
-
24
-
25
-
26
-
27
-
28
-
29
-
30
-
31
-
32
-
33
-
34
-
35
-
36
-
37
-
38
-
39
-
40
-
41
-
42
-
43
-
44
-
45
-
46
-
47
-
48
 |
 |
