Dell Inspiron 8000 Solutions Guide - Page 14
Connecting a Printer, Installing the Printer Driver, Parallel Printer
 |
View all Dell Inspiron 8000 manuals
Add to My Manuals
Save this manual to your list of manuals |
Page 14 highlights
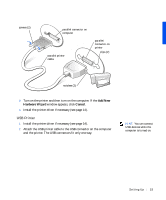
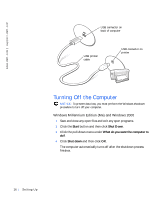
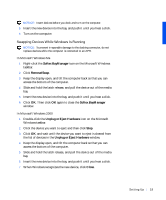
www.dell.com | support.dell.com HINT: For complete printer driver installation instructions, refer to your printer documentation. Connecting a Printer See the documentation that came with the printer for any recommended preparation procedures, such as: • Removing the packaging • Installing the toner or ink cartridge • Loading paper Then follow the instructions that came with the printer to connect it to the computer. If no information is provided, see the following sections. Installing the Printer Driver Dell installs drivers for some new printers. Click the Start button, point to Settings, and then click Printers. If your printer is listed in the Printers window, the printer is ready to use. If you need to install a printer driver, insert the installation CD into the CD or DVD drive. Then follow the prompts on the screen using the instructions that came with the printer. If your printer installation CD does not automatically run, click the Start button on the Microsoft® Windows® desktop, click Run, and type x:\setup.exe (where x is the letter of your CD or DVD drive [usually drive D]). Then click OK and follow the prompts on your screen. Parallel Printer 1 Turn off the computer (see page 16). NOTICE: Use only a standard IEEE parallel cable measuring 3 m (10 ft) or less to connect the printer to the computer. Use of a nonstandard cable may prevent the printer from working. 2 Attach the parallel printer cable to the parallel connector on the computer and tighten the two screws. Attach the cable to the parallel connector on the printer and snap the two clips into the two notches. 14 Sett ing Up
-
 1
1 -
2
-
3
-
4
-
5
-
6
-
7
-
8
-
 9
9 -
 10
10 -
 11
11 -
 12
12 -
 13
13 -
 14
14 -
 15
15 -
 16
16 -
 17
17 -
 18
18 -
 19
19 -
20
-
21
-
22
-
23
-
24
-
25
-
26
-
27
-
28
-
29
-
30
-
31
-
32
-
33
-
34
-
35
-
36
-
37
-
38
-
39
-
40
-
41
-
42
-
43
-
44
-
45
-
46
-
47
-
48
-
49
-
50
-
51
-
52
-
53
-
54
-
55
-
56
-
57
-
58
-
59
-
60
-
61
-
62
-
63
-
64
-
65
-
66
-
67
-
68
-
69
-
70
-
71
-
72
-
73
-
74
-
75
-
76
-
77
-
78
-
79
-
80
-
81
-
82
-
83
-
84
-
85
-
86
-
87
-
88
-
89
-
90
-
91
-
92
-
93
-
94
-
95
-
96
 |
 |