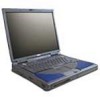
Dell Inspiron 8000 Solutions Guide - Page 52
Docking the Computer, computer see
 |
View all Dell Inspiron 8000 manuals
Add to My Manuals
Save this manual to your list of manuals |
Page 52 highlights
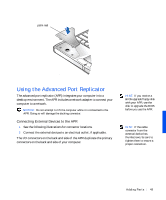
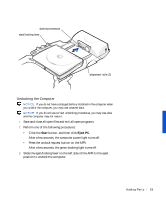
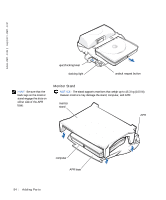
www.dell.com | support.dell.com Docking the Computer NOTICE: Before you initially connect your computer to the APR, you must complete the operating system setup. When you see the Windows® desktop on your screen, the operating system setup is complete. You dock your computer when you connect it to an APR. You must connect the AC adapter to the APR before you dock and turn on the computer. The AC adapter powers the APR and the computer at the same time. Any battery installed in the computer charges while you use the APR. NOTICE: Always use the Dell™ AC adapter that came with the APR. If you use any other commercially available AC adapter-or the AC adapter from other Dell computers-you may damage the APR or the computer. 1 Save and close all open files, exit all open programs, and shut down the computer (see page 16). 2 Disconnect any external devices, and remove any PC Cards from the computer. 3 Connect the AC adapter to the connector on the APR, and connect the AC power cable to an electrical outlet. 4 Horizontally center the computer on the APR base, with the back of the computer facing the APR docking connector. 5 Slide the computer toward the connector until you feel the grooves on the bottom of the computer engage with the alignment rails. NOTICE: If you attempt to push the computer all the way into the APR without engaging the alignment rails, you may irreparably damage the docking connector on the computer. If you have a monitor stand installed, you will not be able to see the alignment rails or the docking connector. 6 Gently push the computer forward until the docking connector is fully engaged. 7 Slide the eject/locking lever towards the back of the APR to the locked position. 52 Adding Parts
-
 1
1 -
2
-
3
-
4
-
5
-
6
-
7
-
8
-
9
-
10
-
11
-
12
-
13
-
14
-
15
-
16
-
17
-
18
-
19
-
20
-
21
-
22
-
23
-
24
-
25
-
26
-
27
-
28
-
29
-
30
-
31
-
32
-
33
-
34
-
35
-
36
-
37
-
38
-
39
-
40
-
41
-
42
-
43
-
44
-
45
-
46
-
 47
47 -
 48
48 -
 49
49 -
 50
50 -
 51
51 -
 52
52 -
 53
53 -
 54
54 -
 55
55 -
 56
56 -
 57
57 -
58
-
59
-
60
-
61
-
62
-
63
-
64
-
65
-
66
-
67
-
68
-
69
-
70
-
71
-
72
-
73
-
74
-
75
-
76
-
77
-
78
-
79
-
80
-
81
-
82
-
83
-
84
-
85
-
86
-
87
-
88
-
89
-
90
-
91
-
92
-
93
-
94
-
95
-
96
 |
 |