Dell Latitude 7350 Detachable Owners Manual - Page 73
Installing the battery, Steps, For computers with WWAN support, Next steps
 |
View all Dell Latitude 7350 Detachable manuals
Add to My Manuals
Save this manual to your list of manuals |
Page 73 highlights
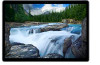
Figure 41. Installing the battery Steps 1. Using the alignment posts, place the battery on the back-cover assembly. 2. Align the screw holes on the battery with the screw holes on the system board and back-cover assembly. 3. Replace the six screws (M2x3) that secure the battery to the back-cover. 4. For computers with WWAN support: NOTE: Skip to the next step if your computer does not support WWAN. a. Route the orange MIMO3 WWAN antenna, green WWAN P-sensor and blue MIMO2 WWAN antenna cables through the routing channels and clips around the battery. b. Adhere the mylar that secures the antenna cables in place. c. Connect the orange MIMO3 WWAN antenna and blue MIMO2 WWAN antenna cables to the WWAN card. d. Connect the green P-sensor to the connector (Psensor2) on the system board. e. Place the WWAN-card bracket over the antenna connectors of the WWAN card. f. Tighten the captive screw (M1.6x2.5) that secures the WWAN and bracket to the system board. 5. Connect the HALL sensor daughter board FPC to the connector (Kickstand Detect) on the system board and close the latches. 6. Connect the HALL sensor daughter board FPC and docking-connector FPC to the connectors on the system board and close the latches. 7. Connect the docking-connector FPC to the connector (Pogo Pin) on the system board and close the latches. Next steps 1. Install the display assembly. NOTE: Be sure to replace the interposer board on the system board before reconnecting the battery as instructed in the display assembly removal procedure. 2. Install the SIM-card tray. Removing and installing Field Replaceable Units (FRUs) 73
-
 1
1 -
2
-
3
-
4
-
5
-
6
-
7
-
8
-
9
-
10
-
11
-
12
-
13
-
14
-
15
-
16
-
17
-
18
-
19
-
20
-
21
-
22
-
23
-
24
-
25
-
26
-
27
-
28
-
29
-
30
-
31
-
32
-
33
-
34
-
35
-
36
-
37
-
38
-
39
-
40
-
41
-
42
-
43
-
44
-
45
-
46
-
47
-
48
-
49
-
50
-
51
-
52
-
53
-
54
-
55
-
56
-
57
-
58
-
59
-
60
-
61
-
62
-
63
-
64
-
65
-
66
-
67
-
 68
68 -
 69
69 -
 70
70 -
 71
71 -
 72
72 -
 73
73 -
 74
74 -
 75
75 -
 76
76 -
 77
77 -
 78
78 -
79
-
80
-
81
-
82
-
83
-
84
-
85
-
86
-
87
-
88
-
89
-
90
-
91
-
92
-
93
-
94
-
95
-
96
-
97
-
98
-
99
-
100
-
101
-
102
-
103
-
104
-
105
-
106
-
107
-
108
-
109
-
110
-
111
-
112
-
113
-
114
-
115
-
116
-
117
-
118
-
119
-
120
-
121
-
122
-
123
-
124
-
125
-
126
-
127
-
128
-
129
-
130
-
131
-
132
-
133
-
134
-
135
-
136
-
137
-
138
-
139
-
140
-
141
-
142
-
143
-
144
-
145
-
146
-
147
-
148
-
149
 |
 |
