Dell OptiPlex NX1 Service Manual - Page 132
toward the drive cage, and fit the bracket's sliding tab on the drive-cage slide
 |
View all Dell OptiPlex NX1 manuals
Add to My Manuals
Save this manual to your list of manuals |
Page 132 highlights
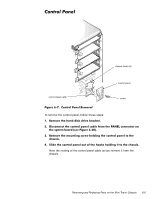
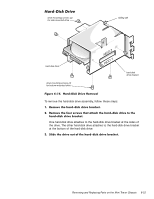
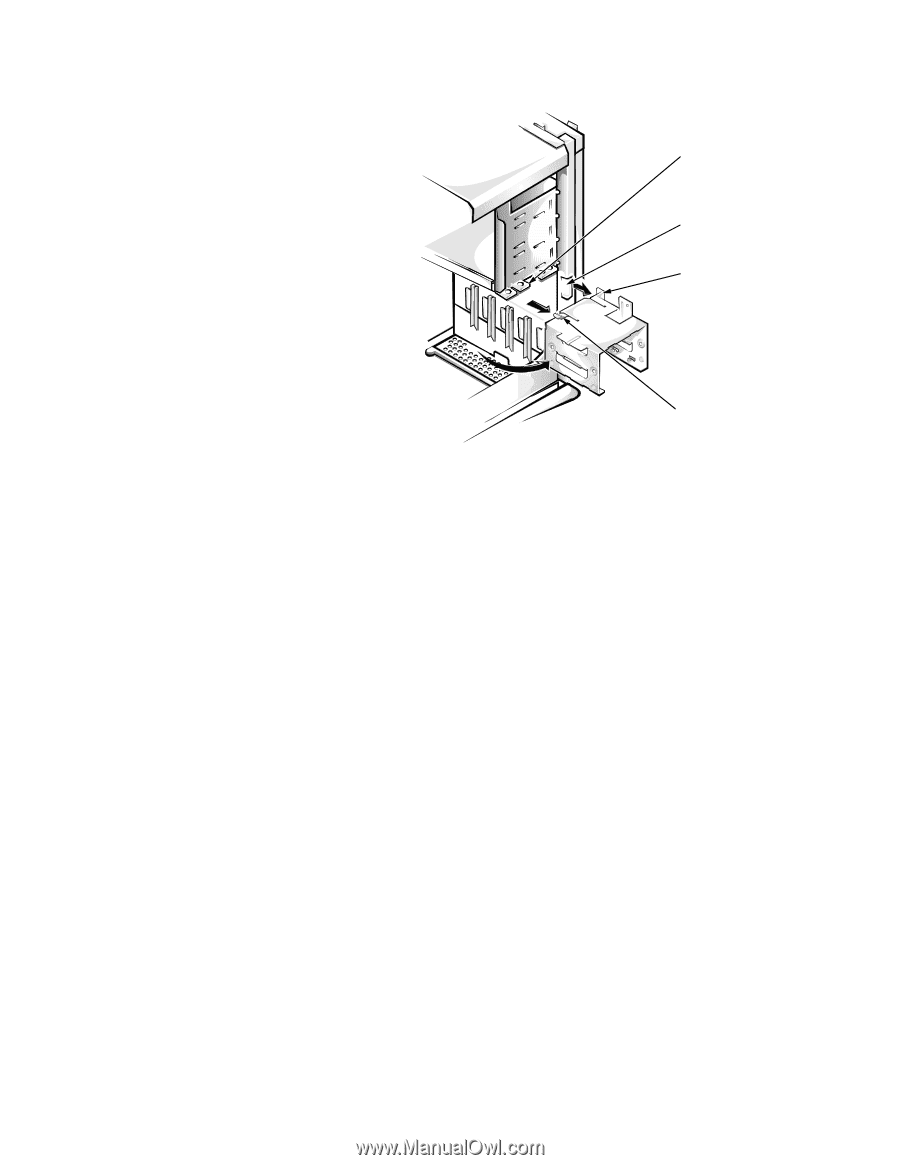
drive-cage slide rail chassis slot hinge tabs (3) sliding tab To remove the hard-disk drive bracket, follow these steps: When you reinstall the hard-disk drive bracket, insert the bracket's hinge tabs into the chassis slot so that the tabs hook over the slot. Then rotate the bracket toward the drive cage, and fit the bracket's sliding tab on the drive-cage slide rail. 6-14
-
 1
1 -
2
-
3
-
4
-
5
-
6
-
7
-
8
-
9
-
10
-
11
-
12
-
13
-
14
-
15
-
16
-
17
-
18
-
19
-
20
-
21
-
22
-
23
-
24
-
25
-
26
-
27
-
28
-
29
-
30
-
31
-
32
-
33
-
34
-
35
-
36
-
37
-
38
-
39
-
40
-
41
-
42
-
43
-
44
-
45
-
46
-
47
-
48
-
49
-
50
-
51
-
52
-
53
-
54
-
55
-
56
-
57
-
58
-
59
-
60
-
61
-
62
-
63
-
64
-
65
-
66
-
67
-
68
-
69
-
70
-
71
-
72
-
73
-
74
-
75
-
76
-
77
-
78
-
79
-
80
-
81
-
82
-
83
-
84
-
85
-
86
-
87
-
88
-
89
-
90
-
91
-
92
-
93
-
94
-
95
-
96
-
97
-
98
-
99
-
100
-
101
-
102
-
103
-
104
-
105
-
106
-
107
-
108
-
109
-
110
-
111
-
112
-
113
-
114
-
115
-
116
-
117
-
118
-
119
-
120
-
121
-
122
-
123
-
124
-
125
-
126
-
 127
127 -
 128
128 -
 129
129 -
 130
130 -
 131
131 -
 132
132 -
 133
133 -
 134
134 -
 135
135 -
 136
136 -
 137
137 -
138
-
139
-
140
-
141
-
142
-
143
-
144
-
145
-
146
-
147
-
148
-
149
-
150
-
151
-
152
-
153
-
154
-
155
-
156
-
157
-
158
-
159
-
160
-
161
-
162
-
163
-
164
-
165
-
166
-
167
-
168
-
169
-
170
-
171
-
172
-
173
-
174
-
175
-
176
-
177
-
178
 |
 |
6-14
’HOO±2SWL3OH[±*;²±0DQDJHG±3&±DQG±2SWL3OH[±1;²±1HW±3&±6\VWHPV±6HUYLFH±0DQXDO
+DUG´’LVN±’ULYH±%UDFNHW
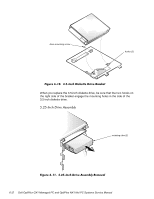
)LJXUH±¹´²¶³±±+DUG´’LVN±’ULYH±%UDFNHW±5HPRYDO±±±
To remove the hard-disk drive bracket, follow these steps:
¸³
’LVFRQQHFW²WKH²’&²SRZHU²FDEOH²DQG²WKH²LQWHUIDFH²FDEOH²IURP²WKH²
EDFN²RI²HDFK²KDUG´GLVN²GULYH²LQVWDOOHG²LQ²WKH²KDUG´GLVN²GULYH²
EUDFNHW³
º³
5HPRYH²WKH²VFUHZ²WKDW²VHFXUHV²WKH²KDUG´GLVN²GULYH²EUDFNHW²WR²WKH²
GULYH²FDJH²LQ²WKH²FKDVVLV³
»³
*UDVS²WKH²EUDFNHW¶²DQG²URWDWH²LW²RXWZDUG²IURP²WKH²FKDVVLV²XQWLO²
WKH²VOLGLQJ²WDE²FOHDUV²WKH²VOLGH²UDLO²RQ²WKH²GULYH²FDJH³
¾³
/LIW²WKH²KDUG´GLVN²GULYH²EUDFNHW²XS²VOLJKWO\²WR²IUHH²WKH²KLQJH²WDEV²
DQG²UHPRYH²LW²IURP²WKH²FRPSXWHU³
When you reinstall the hard-disk drive bracket, insert the bracket’s hinge tabs
into the chassis slot so that the tabs hook over the slot. Then rotate the bracket
toward the drive cage, and fit the bracket’s sliding tab on the drive-cage slide
rail.
drive-cage
slide rail
chassis slot
hinge tabs (3)
sliding tab