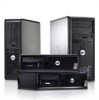
Dell OptiPlex NX1 Service Manual - Page 143
the assembly and press firmly with up to 25 pounds of force to mate the SEC
 |
View all Dell OptiPlex NX1 manuals
Add to My Manuals
Save this manual to your list of manuals |
Page 143 highlights
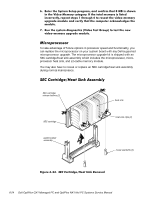
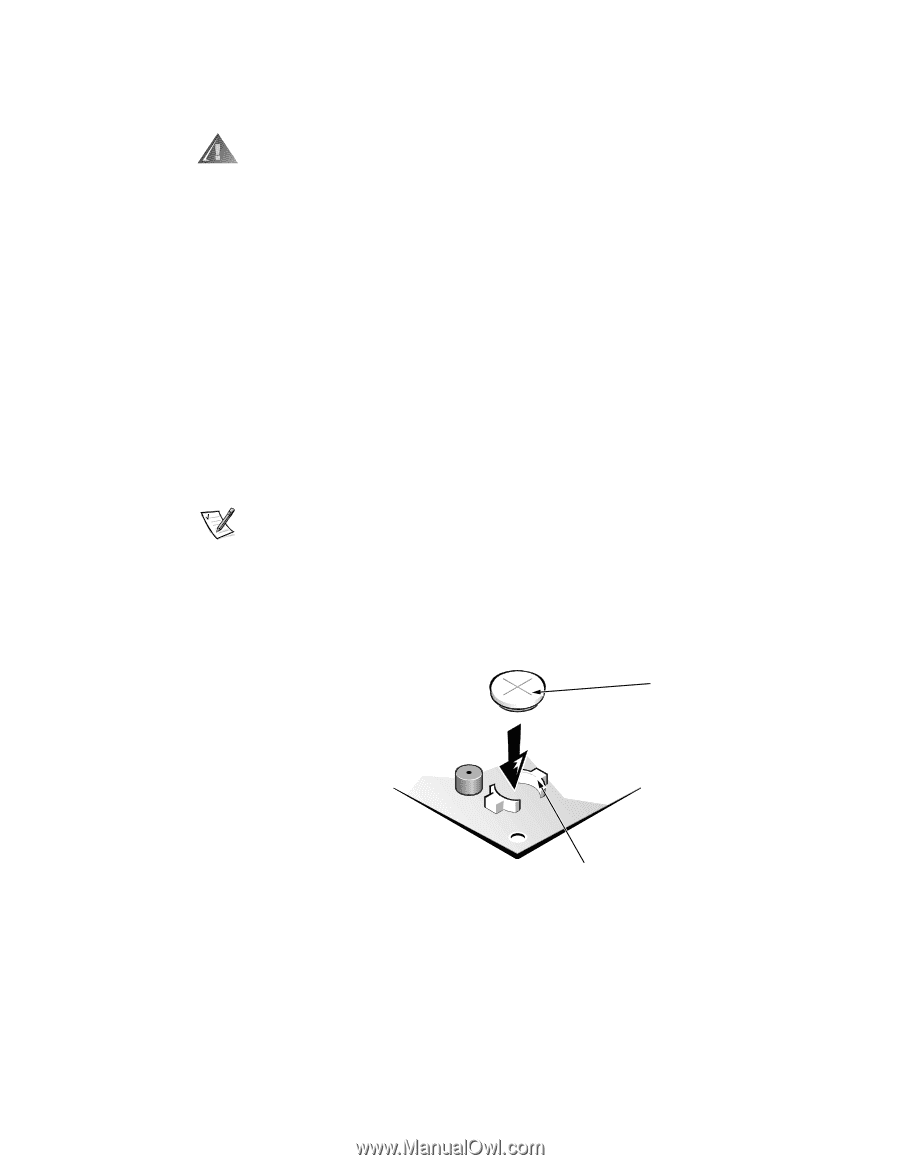
To remove the SEC cartridge/heat sink assembly, follow these steps: NOTE: When installing the SEC cartridge/heat sink assembly, carefully orient the assembly and press firmly with up to 25 pounds of force to mate the SEC cartridge with its connector. Then slide the SEC cartridge release latches outward to lock the assembly onto the metal standoffs. battery BATTERY socket To remove the system battery, follow these steps: Removing and Replacing Parts on the Mini Tower Chassis 6-25
-
 1
1 -
2
-
3
-
4
-
5
-
6
-
7
-
8
-
9
-
10
-
11
-
12
-
13
-
14
-
15
-
16
-
17
-
18
-
19
-
20
-
21
-
22
-
23
-
24
-
25
-
26
-
27
-
28
-
29
-
30
-
31
-
32
-
33
-
34
-
35
-
36
-
37
-
38
-
39
-
40
-
41
-
42
-
43
-
44
-
45
-
46
-
47
-
48
-
49
-
50
-
51
-
52
-
53
-
54
-
55
-
56
-
57
-
58
-
59
-
60
-
61
-
62
-
63
-
64
-
65
-
66
-
67
-
68
-
69
-
70
-
71
-
72
-
73
-
74
-
75
-
76
-
77
-
78
-
79
-
80
-
81
-
82
-
83
-
84
-
85
-
86
-
87
-
88
-
89
-
90
-
91
-
92
-
93
-
94
-
95
-
96
-
97
-
98
-
99
-
100
-
101
-
102
-
103
-
104
-
105
-
106
-
107
-
108
-
109
-
110
-
111
-
112
-
113
-
114
-
115
-
116
-
117
-
118
-
119
-
120
-
121
-
122
-
123
-
124
-
125
-
126
-
127
-
128
-
129
-
130
-
131
-
132
-
133
-
134
-
135
-
136
-
137
-
 138
138 -
 139
139 -
 140
140 -
 141
141 -
 142
142 -
 143
143 -
 144
144 -
 145
145 -
 146
146 -
 147
147 -
 148
148 -
149
-
150
-
151
-
152
-
153
-
154
-
155
-
156
-
157
-
158
-
159
-
160
-
161
-
162
-
163
-
164
-
165
-
166
-
167
-
168
-
169
-
170
-
171
-
172
-
173
-
174
-
175
-
176
-
177
-
178
 |
 |
Removing and Replacing Parts on the Mini Tower Chassis
6-25
To remove the SEC cartridge/heat sink assembly, follow these steps:
¸³
5HPRYH²WKH²V\VWHP²SRZHU²VXSSO\³
:$51,1*±²7KH²6(&²FDUWULGJHµKHDW²VLQN²DVVHPEO\²FDQ²JHW²H[WUHPHO\²
KRW²GXULQJ²V\VWHP²RSHUDWLRQV³²%H²VXUH²WKDW²WKH²DVVHPEO\²KDV²KDG²VXI´
ILFLHQW²WLPH²WR²FRRO²EHIRUH²WRXFKLQJ²LW³
º³
/RFDWH²WKH²6(&²FDUWULGJHµKHDW²VLQN²DVVHPEO\³
»³
’LVFRQQHFW²WKH²PLFURSURFHVVRU²IDQ²FRQQHFWRU²IURP²WKH²»´SLQ²
FRQQHFWRU²RQ²WKH²V\VWHP²ERDUG²·ODEHOHG²Ä)$1Μ½¶²ORFDWHG²EHWZHHQ²
WKH²6(5,$/º²FRQQHFWRU²DQG²WKH²021,725²FRQQHFWRU²·VHH²
)LJXUH ¿´º¼½³
¾³
5HOHDVH²WKH²WZR²VHFXULQJ²FOLSV²QHDU²WKH²EDVH²RI²WKH²KHDW²VLQN²IURP²
WKH²PHWDO²VWDQGRIIV³
¹³
/RFDWH²DQG²SUHVV²LQZDUG²RQ²WKH²6(&²FDUWULGJH²UHOHDVH²ODWFKHV²
·ORFDWHG²GLUHFWO\²RQ²WRS²RI²WKH²6(&²FDUWULGJH²DGMDFHQW²WR²WKH²KHDW²
VLQN²DVVHPEO\½²XQWLO²WKH²ODWFKHV²FOLFN³
¿³
/LIW²WKH²6(&²FDUWULGJHµKHDW²VLQN²DVVHPEO\²RXW²RI²LWV²JXLGH²EUDFNHW²
DVVHPEO\µFRQQHFWRU²RQ²WKH²V\VWHP²ERDUG³
NOTE: When installing the SEC cartridge/heat sink assembly, carefully orient
the assembly and press firmly with up to 25 pounds of force to mate the SEC
cartridge with its connector. Then slide the SEC cartridge release latches out-
ward to lock the assembly onto the metal standoffs.
6\VWHP±%DWWHU\
)LJXUH±¹´µ¸³±±6\VWHP±%DWWHU\±,QVWDOODWLRQ
To remove the system battery, follow these steps:
¸³
,I²SRVVLEOH¶²ERRW²WKH²V\VWHP²DQG²HQWHU²WKH²6\VWHP²6HWXS²SURJUDP³²
7KHQ²UHFRUG²LPSRUWDQW²V\VWHP²FRQILJXUDWLRQ²LQIRUPDWLRQ²·VHH²
$SSHQGL[²$¶²Ä6\VWHP²6HWXS²3URJUDP¶Μ²IRU²GHWDLOV½³
BATTERY socket
battery