Dell OptiPlex NX1 Service Manual - Page 62

Qvhuw²d²frs\²ri²wkh², ²lqwr²wkh²glvnhwwh²

Page 62 highlights

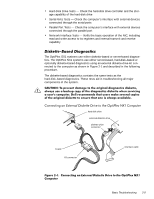
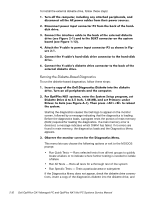
To install the external diskette drive, follow these steps: To run the diskette-based diagnostics, follow these steps: Starting the diagnostics causes the Dell logo to appear on the monitor screen, followed by a message indicating that the diagnostics is loading. Before the diagnostics loads, a program tests the portion of main memory (RAM) required for loading the diagnostics. If a main memory error is detected, a message indicates which DIMM has failed. If no errors are found in main memory, the diagnostics loads and the Diagnostics Menu appears. This menu lets you choose the following options or exit to the MS-DOS prompt: Run Quick Tests - Runs selected tests from all test groups to quickly locate a failure or to indicate where further testing is needed to isolate a failure Run All Tests - Runs all tests for a thorough test of the system Run Specific Tests - Tests a particular area or subsystem If the Diagnostics Menu does not appear, check the diskette drive connections, insert a copy of the diagnostics diskette into the diskette drive, and 2-10

  • 1
  • 2
  • 3
  • 4
  • 5
  • 6
  • 7
  • 8
  • 9
  • 10
  • 11
  • 12
  • 13
  • 14
  • 15
  • 16
  • 17
  • 18
  • 19
  • 20
  • 21
  • 22
  • 23
  • 24
  • 25
  • 26
  • 27
  • 28
  • 29
  • 30
  • 31
  • 32
  • 33
  • 34
  • 35
  • 36
  • 37
  • 38
  • 39
  • 40
  • 41
  • 42
  • 43
  • 44
  • 45
  • 46
  • 47
  • 48
  • 49
  • 50
  • 51
  • 52
  • 53
  • 54
  • 55
  • 56
  • 57
  • 58
  • 59
  • 60
  • 61
  • 62
  • 63
  • 64
  • 65
  • 66
  • 67
  • 68
  • 69
  • 70
  • 71
  • 72
  • 73
  • 74
  • 75
  • 76
  • 77
  • 78
  • 79
  • 80
  • 81
  • 82
  • 83
  • 84
  • 85
  • 86
  • 87
  • 88
  • 89
  • 90
  • 91
  • 92
  • 93
  • 94
  • 95
  • 96
  • 97
  • 98
  • 99
  • 100
  • 101
  • 102
  • 103
  • 104
  • 105
  • 106
  • 107
  • 108
  • 109
  • 110
  • 111
  • 112
  • 113
  • 114
  • 115
  • 116
  • 117
  • 118
  • 119
  • 120
  • 121
  • 122
  • 123
  • 124
  • 125
  • 126
  • 127
  • 128
  • 129
  • 130
  • 131
  • 132
  • 133
  • 134
  • 135
  • 136
  • 137
  • 138
  • 139
  • 140
  • 141
  • 142
  • 143
  • 144
  • 145
  • 146
  • 147
  • 148
  • 149
  • 150
  • 151
  • 152
  • 153
  • 154
  • 155
  • 156
  • 157
  • 158
  • 159
  • 160
  • 161
  • 162
  • 163
  • 164
  • 165
  • 166
  • 167
  • 168
  • 169
  • 170
  • 171
  • 172
  • 173
  • 174
  • 175
  • 176
  • 177
  • 178

2-10
’HOO±2SWL3OH[±*;²±0DQDJHG±3&±DQG±2SWL3OH[±1;²±1HW±3&±6\VWHPV±6HUYLFH±0DQXDO
To install the external diskette drive, follow these steps:
¸³
7XUQ²RII²WKH²FRPSXWHU¶²LQFOXGLQJ²DQ\²DWWDFKHG²SHULSKHUDOV¶²DQG²
GLVFRQQHFW²DOO²WKH²$&²SRZHU²FDEOHV²IURP²WKHLU²SRZHU²VRXUFHV³
º³
’LVFRQQHFW²SRZHU²LQSXW²FRQQHFWRU²3»²IURP²WKH²EDFN²RI²WKH²KDUG´
GLVN²GULYH³
»³
&RQQHFW²WKH²LQWHUIDFH²FDEOH²WR²WKH²EDFN²RI²WKH²H[WHUQDO²GLVNHWWH²
GULYH²·VHH²)LJXUH²º´¸½²DQG²WR²WKH²’6.7²FRQQHFWRU²RQ²WKH²V\VWHP²
ERDUG²·VHH²)LJXUH²¸´¸º½³
¾³
$WWDFK²WKH²<´FDEOH²WR²SRZHU²LQSXW²FRQQHFWRU²3»²DV²VKRZQ²LQ²)LJ´
XUH²º´¸³
¹³
&RQQHFW²WKH²<´FDEOH•V²KDUG´GLVN²GULYH²FRQQHFWRU²WR²WKH²KDUG´GLVN²
GULYH³
¿³
&RQQHFW²WKH²<´FDEOH•V²GLVNHWWH²GULYH²FRQQHFWRU²WR²WKH²EDFN²RI²WKH²
H[WHUQDO²GLVNHWWH²GULYH³
5XQQLQJ±WKH±’LVNHWWH´%DVHG±’LDJQRVWLFV
To run the diskette-based diagnostics, follow these steps:
¸³
,QVHUW²D²FRS\²RI²WKH²
’HOO±’LDJQRVWLFV±’LVNHWWH
²LQWR²WKH²GLVNHWWH²
GULYH³²7XUQ²RQ²DOO²SHULSKHUDOV²DQG²WKH²FRPSXWHU³
º³
)RU²2SWL3OH[²1;¸²V\VWHPV¶²HQWHU²WKH²6\VWHP²6HWXS²SURJUDP¶²VHW²
’LVNHWWH²’ULYH²$²WR²»³¹²,QFK¶²¸³¾¾ 0%¶²DQG²VHW²3ULPDU\±²XQGHU²
’ULYHV±²WR²$XWR²·VHH²)LJXUH²$´¸½³²7KHQ²SUHVV²Â$OW!Â%!²WR²UHERRW²
WKH²V\VWHP³
Starting the diagnostics causes the Dell logo to appear on the monitor
screen, followed by a message indicating that the diagnostics is loading.
Before the diagnostics loads, a program tests the portion of main memory
(RAM) required for loading the diagnostics. If a main memory error is
detected, a message indicates which DIMM has failed. If no errors are
found in main memory, the diagnostics loads and the Diagnostics Menu
appears.
»³
2EVHUYH²WKH²PRQLWRU²VFUHHQ²IRU²WKH²’LDJQRVWLFV²0HQX³
This menu lets you choose the following options or exit to the MS-DOS
prompt:
¼
Run Quick Tests — Runs selected tests from all test groups to quickly
locate a failure or to indicate where further testing is needed to isolate
a failure
¼
Run All Tests — Runs all tests for a thorough test of the system
¼
Run Specific Tests — Tests a particular area or subsystem
If the Diagnostics Menu does not appear, check the diskette drive connec-
tions, insert a copy of the diagnostics diskette into the diskette drive, and