Dell OptiPlex NX1 Service Manual - Page 152
the chassis until the retention tab snaps into place. Route the EIDE cable
 |
View all Dell OptiPlex NX1 manuals
Add to My Manuals
Save this manual to your list of manuals |
Page 152 highlights
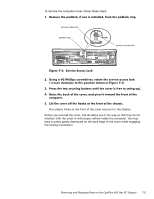
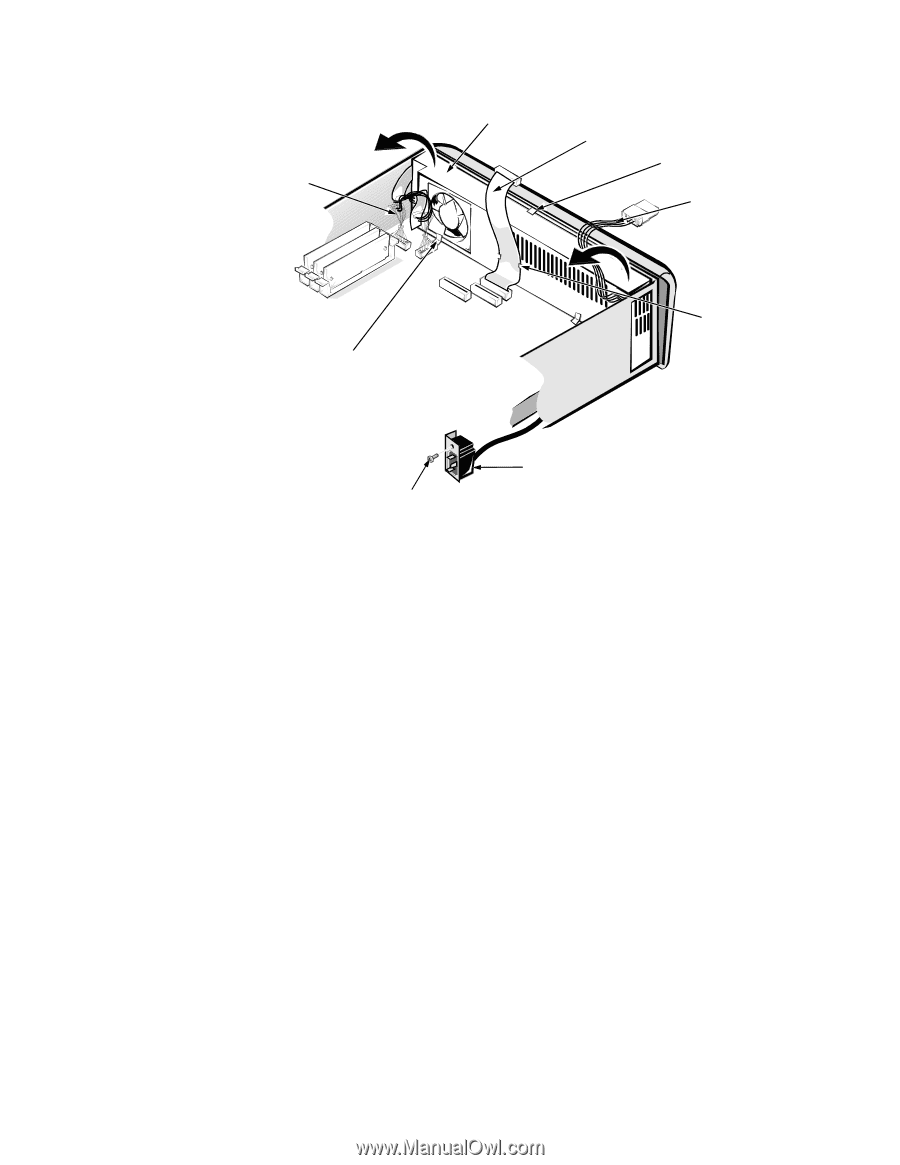
systemboard DC power cables (2) power supply EIDE cable power-supply retention tab hard-disk drive DC power cable chassis tabs (2) cable tabs (2) screw AC power receptacle To remove the system power supply, follow these steps: When you reinstall the system power supply, place it in front of the two tabs on the bottom of the chassis. Then rotate the power supply toward the front of the chassis until the retention tab snaps into place. Route the EIDE cable under the cable tabs on the power supply before reinstalling the expansioncard cage. 7-8
-
 1
1 -
2
-
3
-
4
-
5
-
6
-
7
-
8
-
9
-
10
-
11
-
12
-
13
-
14
-
15
-
16
-
17
-
18
-
19
-
20
-
21
-
22
-
23
-
24
-
25
-
26
-
27
-
28
-
29
-
30
-
31
-
32
-
33
-
34
-
35
-
36
-
37
-
38
-
39
-
40
-
41
-
42
-
43
-
44
-
45
-
46
-
47
-
48
-
49
-
50
-
51
-
52
-
53
-
54
-
55
-
56
-
57
-
58
-
59
-
60
-
61
-
62
-
63
-
64
-
65
-
66
-
67
-
68
-
69
-
70
-
71
-
72
-
73
-
74
-
75
-
76
-
77
-
78
-
79
-
80
-
81
-
82
-
83
-
84
-
85
-
86
-
87
-
88
-
89
-
90
-
91
-
92
-
93
-
94
-
95
-
96
-
97
-
98
-
99
-
100
-
101
-
102
-
103
-
104
-
105
-
106
-
107
-
108
-
109
-
110
-
111
-
112
-
113
-
114
-
115
-
116
-
117
-
118
-
119
-
120
-
121
-
122
-
123
-
124
-
125
-
126
-
127
-
128
-
129
-
130
-
131
-
132
-
133
-
134
-
135
-
136
-
137
-
138
-
139
-
140
-
141
-
142
-
143
-
144
-
145
-
146
-
 147
147 -
 148
148 -
 149
149 -
 150
150 -
 151
151 -
 152
152 -
 153
153 -
 154
154 -
 155
155 -
 156
156 -
 157
157 -
158
-
159
-
160
-
161
-
162
-
163
-
164
-
165
-
166
-
167
-
168
-
169
-
170
-
171
-
172
-
173
-
174
-
175
-
176
-
177
-
178
 |
 |
7-8
’HOO±2SWL3OH[±*;²±0DQDJHG±3&±DQG±2SWL3OH[±1;²±1HW±3&±6\VWHPV±6HUYLFH±0DQXDO
6\VWHP±3RZHU±6XSSO\
)LJXUH±º´º³±±6\VWHP±3RZHU´6XSSO\±5HPRYDO
To remove the system power supply, follow these steps:
¸³
’LVFRQQHFW²WKH²$&²SRZHU²FDEOH²IURP²WKH²EDFN²RI²WKH²FRPSXWHU³
º³
’LVFRQQHFW²WKH²’&²SRZHU²FDEOHV²IURP²WKH²V\VWHP²ERDUG²DQG²WKH²
KDUG´GLVN²GULYH³
»³
5HPRYH²WKH²H[SDQVLRQ´FDUG²FDJH³
¾³
5HPRYH²WKH²(,’(²FDEOH²IURP²WKH²WDEV²RQ²WKH²SRZHU²VXSSO\³
¹³
5HPRYH²WKH²VFUHZ²VHFXULQJ²WKH²$&²SRZHU²UHFHSWDFOH²WR²WKH²EDFN²RI²
WKH²FKDVVLV¶²DQG²OLIW²WKH²FRQQHFWRU²DZD\²IURP²WKH²FKDVVLV³
¿³
5RWDWH²WKH²WRS²RI²WKH²V\VWHP²SRZHU²VXSSO\²EDFN²XQWLO²LW²FOHDUV²WKH²
UHWHQWLRQ²WDEòWKHQ²OLIW²WKH²SRZHU²VXSSO\²IURP²WKH²FKDVVLV³
When you reinstall the system power supply, place it in front of the two tabs
on the bottom of the chassis. Then rotate the power supply toward the front of
the chassis until the retention tab snaps into place. Route the EIDE cable
under the cable tabs on the power supply before reinstalling the expansion-
card cage.
power
supply
power-supply
retention tab
chassis tabs (2)
hard-disk drive
DC power cable
system-
board
DC power
cables (2)
AC power receptacle
screw
EIDE cable
cable tabs (2)