Dell OptiPlex NX1 Service Manual - Page 56
Qvhuw²dqrwkhu²frs\²ri²wkh², ²lqwr²wkh²glv´
 |
View all Dell OptiPlex NX1 manuals
Add to My Manuals
Save this manual to your list of manuals |
Page 56 highlights
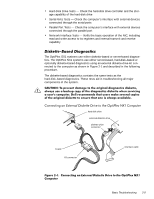
Diskette-drive and hard-disk drive access indicators: These indicators light up in response to data being transferred to or from the drives. If either of these indicators fails to light up during the boot routine, troubleshoot the diskette drive or hard-disk drive subsystem, as appropriate. System error messages: These messages can indicate problems or provide status information. If a system error message is displayed, see Table 3-2. Beep codes: A beep code is a series of beeps that indicates an error condition. If the system emits a beep code, see Table 3-1. Does the Diagnostics Menu appear? Yes. See "Running the System Diagnostics" found later in this chapter. No. Proceed to step 6. Does the Diagnostics Menu appear? Yes. See "Running the System Diagnostics" found later in this chapter. No. Proceed to the next section, "Internal Visual Inspection." A simple visual inspection of a computer's interior hardware can often lead to the source of a problem, such as a loose expansion card, cable connector, or mounting screw. When you perform the visual inspection, refer to Figures 1-3 through 1-6 as appropriate for your system for component location information. To perform the internal visual inspection, follow these steps: 2-4
-
 1
1 -
2
-
3
-
4
-
5
-
6
-
7
-
8
-
9
-
10
-
11
-
12
-
13
-
14
-
15
-
16
-
17
-
18
-
19
-
20
-
21
-
22
-
23
-
24
-
25
-
26
-
27
-
28
-
29
-
30
-
31
-
32
-
33
-
34
-
35
-
36
-
37
-
38
-
39
-
40
-
41
-
42
-
43
-
44
-
45
-
46
-
47
-
48
-
49
-
50
-
 51
51 -
 52
52 -
 53
53 -
 54
54 -
 55
55 -
 56
56 -
 57
57 -
 58
58 -
 59
59 -
 60
60 -
 61
61 -
62
-
63
-
64
-
65
-
66
-
67
-
68
-
69
-
70
-
71
-
72
-
73
-
74
-
75
-
76
-
77
-
78
-
79
-
80
-
81
-
82
-
83
-
84
-
85
-
86
-
87
-
88
-
89
-
90
-
91
-
92
-
93
-
94
-
95
-
96
-
97
-
98
-
99
-
100
-
101
-
102
-
103
-
104
-
105
-
106
-
107
-
108
-
109
-
110
-
111
-
112
-
113
-
114
-
115
-
116
-
117
-
118
-
119
-
120
-
121
-
122
-
123
-
124
-
125
-
126
-
127
-
128
-
129
-
130
-
131
-
132
-
133
-
134
-
135
-
136
-
137
-
138
-
139
-
140
-
141
-
142
-
143
-
144
-
145
-
146
-
147
-
148
-
149
-
150
-
151
-
152
-
153
-
154
-
155
-
156
-
157
-
158
-
159
-
160
-
161
-
162
-
163
-
164
-
165
-
166
-
167
-
168
-
169
-
170
-
171
-
172
-
173
-
174
-
175
-
176
-
177
-
178
 |
 |