Dell OptiPlex NX1 Service Manual - Page 82
you rotate the assembly into place.
 |
View all Dell OptiPlex NX1 manuals
Add to My Manuals
Save this manual to your list of manuals |
Page 82 highlights
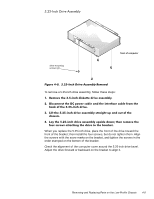
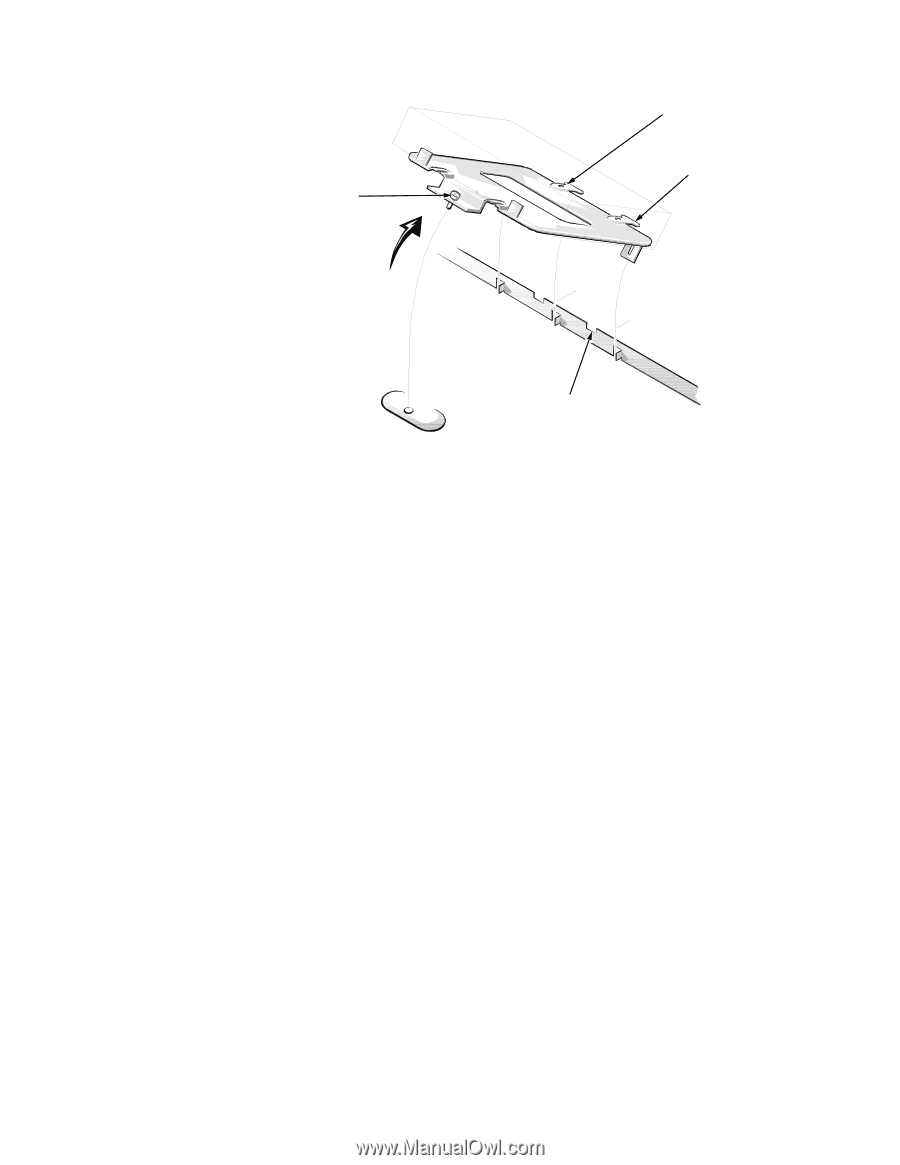
captive screw hard-disk drive mounting screws (4) tabs (2) front of computer notches (2) To remove the hard-disk drive, follow these steps: When you reinstall the hard-disk drive assembly, be sure that the tabs on the back of the mounting plate fully engage the notches on the chassis-before you rotate the assembly into place. 4-10
-
 1
1 -
2
-
3
-
4
-
5
-
6
-
7
-
8
-
9
-
10
-
11
-
12
-
13
-
14
-
15
-
16
-
17
-
18
-
19
-
20
-
21
-
22
-
23
-
24
-
25
-
26
-
27
-
28
-
29
-
30
-
31
-
32
-
33
-
34
-
35
-
36
-
37
-
38
-
39
-
40
-
41
-
42
-
43
-
44
-
45
-
46
-
47
-
48
-
49
-
50
-
51
-
52
-
53
-
54
-
55
-
56
-
57
-
58
-
59
-
60
-
61
-
62
-
63
-
64
-
65
-
66
-
67
-
68
-
69
-
70
-
71
-
72
-
73
-
74
-
75
-
76
-
 77
77 -
 78
78 -
 79
79 -
 80
80 -
 81
81 -
 82
82 -
 83
83 -
 84
84 -
 85
85 -
 86
86 -
 87
87 -
88
-
89
-
90
-
91
-
92
-
93
-
94
-
95
-
96
-
97
-
98
-
99
-
100
-
101
-
102
-
103
-
104
-
105
-
106
-
107
-
108
-
109
-
110
-
111
-
112
-
113
-
114
-
115
-
116
-
117
-
118
-
119
-
120
-
121
-
122
-
123
-
124
-
125
-
126
-
127
-
128
-
129
-
130
-
131
-
132
-
133
-
134
-
135
-
136
-
137
-
138
-
139
-
140
-
141
-
142
-
143
-
144
-
145
-
146
-
147
-
148
-
149
-
150
-
151
-
152
-
153
-
154
-
155
-
156
-
157
-
158
-
159
-
160
-
161
-
162
-
163
-
164
-
165
-
166
-
167
-
168
-
169
-
170
-
171
-
172
-
173
-
174
-
175
-
176
-
177
-
178
 |
 |
4-10
’HOO±2SWL3OH[±*;²±0DQDJHG±3&±DQG±2SWL3OH[±1;²±1HW±3&±6\VWHPV±6HUYLFH±0DQXDO
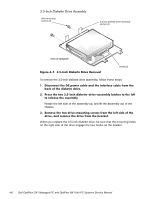
+DUG´’LVN±’ULYH±$VVHPEO\
)LJXUH±·´Á³±±+DUG´’LVN±’ULYH±$VVHPEO\±5HPRYDO±±±
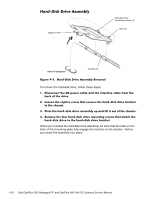
To remove the hard-disk drive, follow these steps:
¸³
’LVFRQQHFW²WKH²’&²SRZHU²FDEOH²DQG²WKH²LQWHUIDFH²FDEOH²IURP²WKH²
EDFN²RI²WKH²GULYH³
º³
/RRVHQ²WKH²FDSWLYH²VFUHZ²WKDW²VHFXUHV²WKH²KDUG´GLVN²GULYH²EUDFNHW²
WR²WKH²FKDVVLV³
»³
3LYRW²WKH²KDUG´GLVN²GULYH²DVVHPEO\²XS²DQG²OLIW²LW²RXW²RI²WKH²FKDVVLV³
¾³
5HPRYH²WKH²IRXU²KDUG´GLVN²GULYH²PRXQWLQJ²VFUHZV²WKDW²DWWDFK²WKH²
KDUG´GLVN²GULYH²WR²WKH²KDUG´GLVN²GULYH²EUDFNHW³
When you reinstall the hard-disk drive assembly, be sure that the tabs on the
back of the mounting plate fully engage the notches on the chassis—before
you rotate the assembly into place.
captive screw
tabs (2)
notches (2)
hard-disk drive
mounting screws (4)
front of computer