Dell OptiPlex NX1 Service Manual - Page 60
let the system complete the load operation
 |
View all Dell OptiPlex NX1 manuals
Add to My Manuals
Save this manual to your list of manuals |
Page 60 highlights
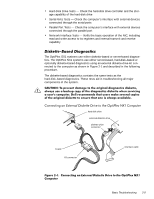
suspected hardware problem, run the hard-disk-based diagnostics by following these steps: If you wait too long and the operating system begins to load into memory, let the system complete the load operation; then shut down the system and try again. Starting the diagnostics causes the Dell logo to appear on the monitor screen, followed by a message indicating that the diagnostics is loading. Before the diagnostics loads, a program tests the portion of main memory (RAM) required for loading the diagnostics. If a main memory error is detected, a message indicates which DIMM has failed. If no errors are found in main memory, the diagnostics loads and the Diagnostics Menu appears. This menu lets you choose the following options or exit to the MS-DOS prompt: Run Quick Tests - Runs selected tests from all test groups to quickly locate a failure or to indicate where further testing is needed to isolate a failure Run All Tests - Runs all tests for a thorough test of the system Run Specific Tests - Tests a particular area or subsystem If the Diagnostics Menu does not appear, check with the network administrator to determine if the service partition was removed from the hard-disk drive. If it is not possible to run the hard-disk-based diagnostics and if you are prepared to remove the computer cover, see "Internal Visual Inspection" found earlier in this chapter. Otherwise, see "Getting Help" found later in this chapter. The hard-disk-based diagnostics consists of the following test groups: RAM Tests - Check all the directly addressable RAM System Set Tests - Check the computer's system board components and verify their related functions Video Tests - Verify proper operation of the video controller and the video control circuitry Keyboard Tests - Verify the correct operation of the keyboard and the keyboard controller chip Mouse Test - Checks the functionality of the mouse controller and the operation of the mouse keys 2-8
-
 1
1 -
2
-
3
-
4
-
5
-
6
-
7
-
8
-
9
-
10
-
11
-
12
-
13
-
14
-
15
-
16
-
17
-
18
-
19
-
20
-
21
-
22
-
23
-
24
-
25
-
26
-
27
-
28
-
29
-
30
-
31
-
32
-
33
-
34
-
35
-
36
-
37
-
38
-
39
-
40
-
41
-
42
-
43
-
44
-
45
-
46
-
47
-
48
-
49
-
50
-
51
-
52
-
53
-
54
-
 55
55 -
 56
56 -
 57
57 -
 58
58 -
 59
59 -
 60
60 -
 61
61 -
 62
62 -
 63
63 -
 64
64 -
 65
65 -
66
-
67
-
68
-
69
-
70
-
71
-
72
-
73
-
74
-
75
-
76
-
77
-
78
-
79
-
80
-
81
-
82
-
83
-
84
-
85
-
86
-
87
-
88
-
89
-
90
-
91
-
92
-
93
-
94
-
95
-
96
-
97
-
98
-
99
-
100
-
101
-
102
-
103
-
104
-
105
-
106
-
107
-
108
-
109
-
110
-
111
-
112
-
113
-
114
-
115
-
116
-
117
-
118
-
119
-
120
-
121
-
122
-
123
-
124
-
125
-
126
-
127
-
128
-
129
-
130
-
131
-
132
-
133
-
134
-
135
-
136
-
137
-
138
-
139
-
140
-
141
-
142
-
143
-
144
-
145
-
146
-
147
-
148
-
149
-
150
-
151
-
152
-
153
-
154
-
155
-
156
-
157
-
158
-
159
-
160
-
161
-
162
-
163
-
164
-
165
-
166
-
167
-
168
-
169
-
170
-
171
-
172
-
173
-
174
-
175
-
176
-
177
-
178
 |
 |