Dell OptiPlex NX1 Service Manual - Page 149
have to press gently downward on the back edge of the cover while engaging
 |
View all Dell OptiPlex NX1 manuals
Add to My Manuals
Save this manual to your list of manuals |
Page 149 highlights
To remove the computer cover, follow these steps: security cable slot padlock ring service access lock Four plastic hooks at the front of the cover secure it to the chassis. Before you reinstall the cover, fold all cables out of the way so that they do not interfere with the cover or with proper airflow inside the computer. You may have to press gently downward on the back edge of the cover while engaging the locking mechanism. Removing and Replacing Parts on the OptiPlex NX1 Net PC Chassis 7-5
-
 1
1 -
2
-
3
-
4
-
5
-
6
-
7
-
8
-
9
-
10
-
11
-
12
-
13
-
14
-
15
-
16
-
17
-
18
-
19
-
20
-
21
-
22
-
23
-
24
-
25
-
26
-
27
-
28
-
29
-
30
-
31
-
32
-
33
-
34
-
35
-
36
-
37
-
38
-
39
-
40
-
41
-
42
-
43
-
44
-
45
-
46
-
47
-
48
-
49
-
50
-
51
-
52
-
53
-
54
-
55
-
56
-
57
-
58
-
59
-
60
-
61
-
62
-
63
-
64
-
65
-
66
-
67
-
68
-
69
-
70
-
71
-
72
-
73
-
74
-
75
-
76
-
77
-
78
-
79
-
80
-
81
-
82
-
83
-
84
-
85
-
86
-
87
-
88
-
89
-
90
-
91
-
92
-
93
-
94
-
95
-
96
-
97
-
98
-
99
-
100
-
101
-
102
-
103
-
104
-
105
-
106
-
107
-
108
-
109
-
110
-
111
-
112
-
113
-
114
-
115
-
116
-
117
-
118
-
119
-
120
-
121
-
122
-
123
-
124
-
125
-
126
-
127
-
128
-
129
-
130
-
131
-
132
-
133
-
134
-
135
-
136
-
137
-
138
-
139
-
140
-
141
-
142
-
143
-
 144
144 -
 145
145 -
 146
146 -
 147
147 -
 148
148 -
 149
149 -
 150
150 -
 151
151 -
 152
152 -
 153
153 -
 154
154 -
155
-
156
-
157
-
158
-
159
-
160
-
161
-
162
-
163
-
164
-
165
-
166
-
167
-
168
-
169
-
170
-
171
-
172
-
173
-
174
-
175
-
176
-
177
-
178
 |
 |

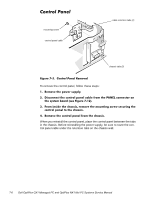
Removing and Replacing Parts on the OptiPlex NX1 Net PC Chassis
7-5
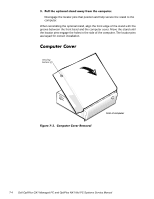
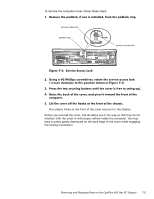
To remove the computer cover, follow these steps:
¸³
5HPRYH²WKH²SDGORFN¶²LI²RQH²LV²LQVWDOOHG¶²IURP²WKH²SDGORFN²ULQJ³
)LJXUH±º´·³±±6HUYLFH±$FFHVV±/RFN
º³
8VLQJ²D²Çº²3KLOOLSV²VFUHZGULYHU¶²URWDWH²WKH²VHUYLFH²DFFHVV²ORFN²
¸µ¾
´WXUQ²FORFNZLVH²WR²WKH²SRVLWLRQ²VKRZQ²LQ²)LJXUH²À´¾³
»³
3UHVV²WKH²WZR²VHFXULQJ²EXWWRQV²XQWLO²WKH²FRYHU²LV²IUHH²WR²VZLQJ²XS½³
¾³
5DLVH²WKH²EDFN²RI²WKH²FRYHU¶²DQG²SLYRW²LW²WRZDUG²WKH²IURQW²RI²WKH²
FRPSXWHU³
¹³
/LIW²WKH²FRYHU²RII²WKH²KRRNV²DW²WKH²IURQW²RI²WKH²FKDVVLV³
Four plastic hooks at the front of the cover secure it to the chassis.
Before you reinstall the cover, fold all cables out of the way so that they do not
interfere with the cover or with proper airflow inside the computer. You may
have to press gently downward on the back edge of the cover while engaging
the locking mechanism.
security cable slot
service access lock
padlock ring