Dell OptiPlex NX1 Service Manual - Page 83
power supply.
 |
View all Dell OptiPlex NX1 manuals
Add to My Manuals
Save this manual to your list of manuals |
Page 83 highlights
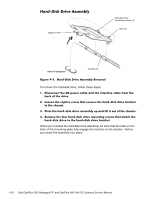
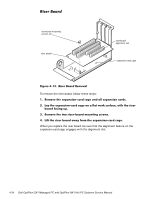
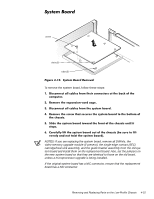
power supply power-supply mounting screw To remove the system power supply, follow these steps: When you replace the system power supply, place it down inside the chassis and against the right side of the chassis. Then slide the system power supply toward the back of the chassis, and hook the tabs into the right side of the power supply. Removing and Replacing Parts on the Low-Profile Chassis 4-11
-
 1
1 -
2
-
3
-
4
-
5
-
6
-
7
-
8
-
9
-
10
-
11
-
12
-
13
-
14
-
15
-
16
-
17
-
18
-
19
-
20
-
21
-
22
-
23
-
24
-
25
-
26
-
27
-
28
-
29
-
30
-
31
-
32
-
33
-
34
-
35
-
36
-
37
-
38
-
39
-
40
-
41
-
42
-
43
-
44
-
45
-
46
-
47
-
48
-
49
-
50
-
51
-
52
-
53
-
54
-
55
-
56
-
57
-
58
-
59
-
60
-
61
-
62
-
63
-
64
-
65
-
66
-
67
-
68
-
69
-
70
-
71
-
72
-
73
-
74
-
75
-
76
-
77
-
 78
78 -
 79
79 -
 80
80 -
 81
81 -
 82
82 -
 83
83 -
 84
84 -
 85
85 -
 86
86 -
 87
87 -
 88
88 -
89
-
90
-
91
-
92
-
93
-
94
-
95
-
96
-
97
-
98
-
99
-
100
-
101
-
102
-
103
-
104
-
105
-
106
-
107
-
108
-
109
-
110
-
111
-
112
-
113
-
114
-
115
-
116
-
117
-
118
-
119
-
120
-
121
-
122
-
123
-
124
-
125
-
126
-
127
-
128
-
129
-
130
-
131
-
132
-
133
-
134
-
135
-
136
-
137
-
138
-
139
-
140
-
141
-
142
-
143
-
144
-
145
-
146
-
147
-
148
-
149
-
150
-
151
-
152
-
153
-
154
-
155
-
156
-
157
-
158
-
159
-
160
-
161
-
162
-
163
-
164
-
165
-
166
-
167
-
168
-
169
-
170
-
171
-
172
-
173
-
174
-
175
-
176
-
177
-
178
 |
 |
Removing and Replacing Parts on the Low-Profile Chassis
4-11
6\VWHP±3RZHU±6XSSO\±
)LJXUH±·´²Â³±±6\VWHP±3RZHU´6XSSO\±5HPRYDO
To remove the system power supply, follow these steps:
¸³
’LVFRQQHFW²WKH²$&²SRZHU²FDEOH²IURP²WKH²EDFN²RI²WKH²SRZHU²VXSSO\³
º³
’LVFRQQHFW²WKH²’&²SRZHU²FDEOHV²IURP²WKH²V\VWHP²ERDUG²DQG²WKH²
GULYHV³
»³
5HPRYH²WKH²SRZHU´VXSSO\²PRXQWLQJ²VFUHZ²DW²WKH²EDFN²RI²WKH²
FKDVVLV³
¾³
6OLGH²WKH²V\VWHP²SRZHU²VXSSO\²IRUZDUG²XQWLO²LW²VWRSVòWKHQ²OLIW²LW²
IURP²WKH²FKDVVLV³
When you replace the system power supply, place it down inside the chassis
and against the right side of the chassis. Then slide the system power supply
toward the back of the chassis, and hook the tabs into the right side of the
power supply.
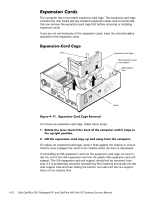
:$51,1*±²7KH²YROWDJH²VHOHFWLRQ²VZLWFK¶²ORFDWHG²RQ²WKH²EDFN²RI²WKH²
SRZHU²VXSSO\²DVVHPEO\¶²PXVW²EH²VHW²WR²WKH²FRUUHFW²RSHUDWLQJ²YROWDJH²
·¸¸¹²RU²º»¼²9½²EHIRUH²WKH²SRZHU²FDEOH²LV²SOXJJHG²LQWR²DQ²$&²RXWOHW³
power supply
power-supply
mounting screw