Dell PowerEdge C6520 EMC Installation and Service Manual - Page 34
Table 9. Configuration 1: R1a, Dell External PERC Adapter
 |
View all Dell PowerEdge C6520 manuals
Add to My Manuals
Save this manual to your list of manuals |
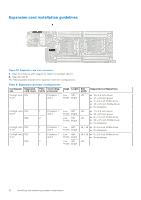
Page 34 highlights
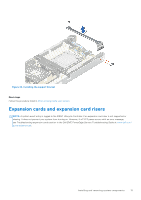
The following table provides guidelines for installing expansion cards to ensure proper cooling and mechanical fit. The expansion cards with the highest priority should be installed first using the slot priority indicated. All the other expansion cards should be installed in the card priority and slot priority order. Table 9. Configuration 1: R1a Card type Broadcom (NIC: 25G) Slot priority 1 Maximum number of cards 1 Broadcom (NIC: 10G) 1 1 Intel (NIC: 10G) 1 1 Broadcom (NIC: 25G) 1 1 Intel (NIC: 1G) 1 1 Mellanox (NIC: 100Gb) 1 1 Intel (NIC: 25Gb) 1 1 Mellanox (NIC: 25Gb) 1 1 SolarFlare (NIC: 25Gb) 1 1 Mellanox (NIC: HDR100 VPI) 1 1 Mellanox (NIC: HDR VPI) 1 1 Intel (OCP: 100Gb) Integrated slot 1 Broadcom (OCP: 25Gb) Integrated slot 1 Intel (OCP: 25Gb) Integrated slot 1 Marvell (OCP: 25Gb) Integrated slot 1 Mellanox (OCP: 25Gb) Integrated slot 1 QLogic (OCP: 25Gb) Integrated slot 1 Broadcom (OCP: 10Gb) Integrated slot 1 QLogic (OCP: 10Gb) Integrated slot 1 Intel (OCP: 10Gb) Integrated slot 1 Broadcom (OCP: 1Gb) Integrated slot 1 Intel (OCP: 1Gb) Integrated slot 1 Dell External PERC Adapter 1 1 Dell BOSS M.2 Module Integrated slot 1 Intel (PCIe SSD AIC) 1 1 Samsung (PCIe SSD AIC) 1 1 Nvidia (GPU: T4 16 GB) 1 1 Table 10. Configuration 2: R1a+R2b Card type Slot priority Broadcom (NIC: 25G) 1, 2 Broadcom (NIC: 10G) 1, 2 Intel (NIC: 10G) 1, 2 Broadcom (NIC: 25G) 1, 2 Intel (NIC: 1G) 1, 2 Mellanox (NIC: 100Gb) 1, 2 Maximum number of cards 2 2 2 2 2 2 34 Installing and removing system components
-
 1
1 -
2
-
3
-
4
-
5
-
6
-
7
-
8
-
9
-
10
-
11
-
12
-
13
-
14
-
15
-
16
-
17
-
18
-
19
-
20
-
21
-
22
-
23
-
24
-
25
-
26
-
27
-
28
-
 29
29 -
 30
30 -
 31
31 -
 32
32 -
 33
33 -
 34
34 -
 35
35 -
 36
36 -
 37
37 -
 38
38 -
 39
39 -
40
-
41
-
42
-
43
-
44
-
45
-
46
-
47
-
48
-
49
-
50
-
51
-
52
-
53
-
54
-
55
-
56
-
57
-
58
-
59
-
60
-
61
-
62
-
63
-
64
-
65
-
66
-
67
-
68
-
69
-
70
-
71
-
72
-
73
-
74
-
75
-
76
-
77
-
78
-
79
-
80
-
81
-
82
-
83
-
84
-
85
-
86
-
87
-
88
-
89
 |
 |
