Dell XPS 720 Black Owner's Manual - Page 18
Attaching the Computer Stand, The LFE Low Frequency Effects Audio channel, found in digital surround
 |
View all Dell XPS 720 Black manuals
Add to My Manuals
Save this manual to your list of manuals |
Page 18 highlights
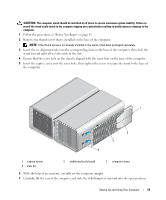
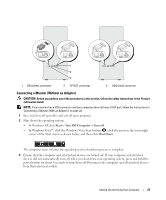
6 side surround sound connector 7 center subwoofer/LFE connector 8 surround sound connector 9 line-in connector 10 line-out/headphone connector 11 microphone connector 12 Optical S/PDIF connector 13 RCA S/PDIF connector 14 USB 2.0 connectors (6) 15 IEEE 1394 connector Use the (silver) side surround connector to attach additional speakers. Use the (orange) subwoofer connector to attach a single subwoofer. NOTE: The LFE (Low Frequency Effects) Audio channel, found in digital surround sound audio schemes, carries only low frequency information of 80 Hz and below. The LFE channel drives a subwoofer to provide extremely low bass extension. Systems not using subwoofers can shunt the LFE information to the main speakers in the surround sound setup. Use the (black) surround sound connector to attach multichannel-capable speakers. Use the (blue) line-in connector to attach a record/playback device such as a cassette player, CD player, or VCR. On computers with a sound card, use the connector on the card. Use the (green) line-out connector to attach headphones and speakers with integrated amplifiers. On computers with a sound card, use the connector on the card. Use the (pink) microphone connector to attach a personal computer microphone for voice or musical input into a sound or telephony program. Use the optical S/PDIF connector to transmit digital audio without going through an analog audio conversion process. Use the RCA S/PDIF connector to transmit digital audio without going through an analog audio conversion process. Use the back USB connectors for devices that typically remain connected, such as printers and keyboards. NOTE: Dell recommends that you use the front USB connectors for devices that you connect occasionally, such as flash memory keys, cameras, or bootable USB devices. Use the IEEE 1394 connector for high-speed data devices such as digital video cameras and external storage devices. Attaching the Computer Stand CAUTION: Before you begin any of the procedures in this section, follow the safety instructions in the Product Information Guide. CAUTION: Your computer is heavy and can be difficult to maneuver. Seek assistance before attempting to lift, move, or tilt the computer and always lift correctly to avoid injury; avoid bending over while lifting. 18 Setting Up and Using Your Computer
-
 1
1 -
2
-
3
-
4
-
5
-
6
-
7
-
8
-
9
-
10
-
11
-
12
-
 13
13 -
 14
14 -
 15
15 -
 16
16 -
 17
17 -
 18
18 -
 19
19 -
 20
20 -
 21
21 -
 22
22 -
 23
23 -
24
-
25
-
26
-
27
-
28
-
29
-
30
-
31
-
32
-
33
-
34
-
35
-
36
-
37
-
38
-
39
-
40
-
41
-
42
-
43
-
44
-
45
-
46
-
47
-
48
-
49
-
50
-
51
-
52
-
53
-
54
-
55
-
56
-
57
-
58
-
59
-
60
-
61
-
62
-
63
-
64
-
65
-
66
-
67
-
68
-
69
-
70
-
71
-
72
-
73
-
74
-
75
-
76
-
77
-
78
-
79
-
80
-
81
-
82
-
83
-
84
-
85
-
86
-
87
-
88
-
89
-
90
-
91
-
92
-
93
-
94
-
95
-
96
-
97
-
98
-
99
-
100
-
101
-
102
-
103
-
104
-
105
-
106
-
107
-
108
-
109
-
110
-
111
-
112
-
113
-
114
-
115
-
116
-
117
-
118
-
119
-
120
-
121
-
122
-
123
-
124
-
125
-
126
-
127
-
128
-
129
-
130
-
131
-
132
-
133
-
134
-
135
-
136
-
137
-
138
-
139
-
140
-
141
-
142
-
143
-
144
-
145
-
146
-
147
-
148
-
149
-
150
-
151
-
152
-
153
-
154
-
155
-
156
-
157
-
158
-
159
-
160
-
161
-
162
-
163
-
164
-
165
-
166
-
167
-
168
-
169
-
170
-
171
-
172
-
173
-
174
-
175
-
176
-
177
-
178
-
179
-
180
-
181
-
182
-
183
-
184
-
185
-
186
-
187
-
188
-
189
-
190
-
191
-
192
-
193
-
194
-
195
-
196
-
197
-
198
-
199
-
200
-
201
-
202
-
203
-
204
-
205
-
206
-
207
-
208
-
209
-
210
-
211
-
212
-
213
-
214
-
215
-
216
-
217
-
218
 |
 |