Dynex DX-24LD230A12 User Manual (English) - Page 22
Viewing photos
 |
View all Dynex DX-24LD230A12 manuals
Add to My Manuals
Save this manual to your list of manuals |
Page 22 highlights
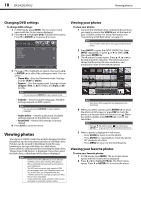
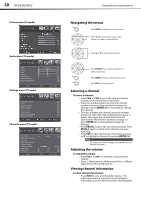
18 DX-24LD230A12 Viewing photos Changing DVD settings To change DVD settings: 1 In DVD mode, press MENU. The on-screen menu opens with the Picture menu displayed. 2 Press or to highlight DVD. The DVD menu opens. Press or ENTER/ to access the menu. Viewing your photos To view your photos: 1 Connect the USB flash drive containing the pictures you want to view to the USB IN jack on the back of your TV/DVD combo. For more information, see "Connecting a USB flash drive" on page 14. Note This TV/DVD combo does not support external hard drives. 2 Press INPUT to open the INPUT SOURCE list. Press INPUT repeatedly, or press or to select USB, then press ENTER/ . 3 The thumbnail screen opens. Press , , , or to browse the photo selection. The information bar shows the file name, file size, resolution, and modification date of the selected photo. 3 Press or to highlight an option, then press , , or ENTER/ to select the setting you want. You can select: • Down Mix-Sets the Downmix mode. Settings include LT/RT or Stereo. • Repeat- Sets the repeat mode. Settings include Chapter, Title, or All for DVDs, and Track or All for CDs. Note You can also press REPEAT to select repeat mode. • Subtitle-Sets the subtitle language. Available settings depend on DVD content. Note You can also press SUBTITLE to select subtitle language. • Audio Select-Sets the audio track. Available settings depend on the DVD disc content. • Reset DVD-Resets DVD settings to factory default. 4 Press EXIT to close the menu. Viewing photos Your Dynex TV/DVD combo has a photo browser function that allows you to view photos saved to a USB flash drive. Pictures can be viewed in thumbnail mode for easy browsing or you can view them in a slide show. If you switch to USB input before inserting the flash drive, "Please Insert USB Device" is displayed. If you then insert the flash drive, a thumbnail of the data is displayed. Notes • • • • Never remove the USB device or turn off your TV/DVD combo while viewing JPEG photos. We recommend that you back up the data on your USB device. The JPEG picture viewer only supports JPEG format images (with ".jpg" file extensions) and not all JPEG files are compatible with the TV/DVD combo. For example, progressive JPEG files are not compatible. Unless otherwise noted, all tasks in this section are based on using the remote control. Note Only those JPEG image files are displayed in the thumbnail. 4 When you select a photo, press ENTER/ to show the photo in full screen or press FAV to mark the photo as a favorite (with the favorite icon ). When you select a folder, press ENTER/ to enter the sub-folder. Note Press , , , or to select icon, then press ENTER/ to go up one level in the photo directory. 5 When a photo is displayed in full screen, • Press ZOOM to zoom in on the photo. • Press ENTER/ repeatedly to rotate the photo 90° clockwise at a time. • Press MENU to return to the thumbnail list. Viewing your favorite photos To view your favorite photos: 1 In USB mode, press MENU. The on-screen menu opens with the Picture menu displayed. 2 Press or to highlight Photo. The Photo menu opens. Press or ENTER/ to access the menu.
-
 1
1 -
2
-
3
-
4
-
5
-
6
-
7
-
8
-
9
-
10
-
11
-
12
-
13
-
14
-
15
-
16
-
 17
17 -
 18
18 -
 19
19 -
 20
20 -
 21
21 -
 22
22 -
 23
23 -
 24
24 -
 25
25 -
 26
26 -
 27
27 -
28
-
29
-
30
-
31
-
32
-
33
-
34
-
35
-
36
-
37
-
38
-
39
-
40
-
41
-
42
-
43
-
44
-
45
-
46
-
47
-
48
 |
 |