Dynex DX-24LD230A12 User Manual (English) - Page 26
Setting power on vivid mode, Adjusting the computer image
 |
View all Dynex DX-24LD230A12 manuals
Add to My Manuals
Save this manual to your list of manuals |
Page 26 highlights
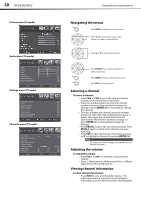
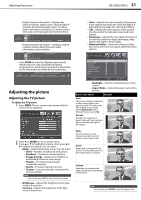
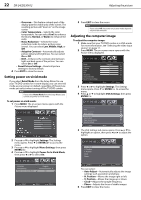
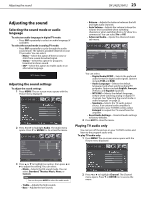
22 DX-24LD230A12 Adjusting the picture • Overscan-This feature extends part of the display past the visible area of the screen. The resulting picture will "zoom in" on the image center. • Color Temperature-Selects the color temperature. You can select Cool (to enhance the blues), Normal, or Warm (to enhance the reds). • Noise Reduction-Selects the noise reduction mode to reduce picture noise (snow). You can select Low, Middle, High, or Off. • Adaptive Contrast-Automatically adjusts picture detail and brightness. You can select On or Off. • DCR-Enhances the contrast ratio between light and dark areas of the picture. You can select On or Off. • Reset Picture Settings-Resets all picture settings to factory default. 4 Press EXIT to close the menu. Setting power on vivid mode If you select Retail Mode from the Setup Wizard to use your TV/DVD combo for in-store display, you can set vivid mode as your power on default, regardless of the picture mode you select when turning off the TV/DVD combo. Note If you select Home Mode from the Setup Wizard, you cannot set power on vivid mode. To set power on vivid mode: 1 Press MENU. The on-screen menu opens with the Picture menu displayed. 5 Press EXIT to close the menu. Note If you select Off, the power on picture mode depends on your last selection. Adjusting the computer image To adjust the computer image: 1 Make sure that your TV/DVD combo is in VGA mode. For more information, see "Selecting the video input source" on page 17. 2 Press MENU. The on-screen menu opens with the Picture menu displayed. 3 Press or to highlight Settings. The Settings menu opens. Press or ENTER/ to access the menu. 4 Press or to highlight VGA Settings, then press ENTER/ . 2 Press or to highlight Settings. The Settings menu opens. Press or ENTER/ to access the menu. 3 Press or to highlight Menu Settings, then press ENTER/ . 4 Press or to highlight Power On In Vivid Mode, then press or to select On. Picture Audio Settings Channel Language Transparency Power On In Vivid Mode English 0 On Select Move Return Open Source Notice Reset to Default 5 The VGA Settings sub-menu opens. Press or to highlight an option, then press or to adjust the option. You can select: • Auto Adjust-Automatically adjusts the image settings such as position and phase. • H. Position-Moves the image right or left. • V. Position-Moves the image up or down. • Clock-Adjusts the sample frequency. • Phase-Adjusts the focus of stable images. 6 Press EXIT to close the menu.
-
 1
1 -
2
-
3
-
4
-
5
-
6
-
7
-
8
-
9
-
10
-
11
-
12
-
13
-
14
-
15
-
16
-
17
-
18
-
19
-
20
-
 21
21 -
 22
22 -
 23
23 -
 24
24 -
 25
25 -
 26
26 -
 27
27 -
 28
28 -
 29
29 -
 30
30 -
 31
31 -
32
-
33
-
34
-
35
-
36
-
37
-
38
-
39
-
40
-
41
-
42
-
43
-
44
-
45
-
46
-
47
-
48
 |
 |
