Dynex DX-24LD230A12 User Manual (English) - Page 39
Restoring default settings
 |
View all Dynex DX-24LD230A12 manuals
Add to My Manuals
Save this manual to your list of manuals |
Page 39 highlights
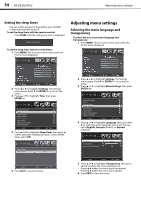
Restoring default settings DX-24LD230A12 35 Labeling an input source You can add a label to a video input source to make it easier to identify. These labels are displayed on the INPUT SOURCE list and on the banner that appears when you press INFO. To label an input source: 1 Press MENU. The on-screen menu opens with the Picture menu displayed. 5 Press ENTER/ again to open the on-screen keyboard. Press , , , or to highlight a character, then press ENTER/ to add the character to the label. Repeat this step to add more characters. 2 Press or to highlight Settings. The Settings menu opens. Press or ENTER/ to access the menu. 3 Press or to highlight Input Labels, then press ENTER/ . • Highlight Caps Lock, then press ENTER/ to toggle the letter case from small to capital letters. • Highlight , then press ENTER/ to delete a character. • Highlight Space, then press ENTER/ to insert a space. 6 When the label you want has been entered, highlight Enter, then press ENTER/ to assign the label to the input source. 7 Press EXIT to close the menu. Open Source Notice Reset to Default 4 Press or to select the input source you want to label, then press or ENTER/ . Restoring default settings Caution When you restore default settings, all the settings (except the password and parental rating) you have customized are reset. Restoring default settings To restore default settings: 1 Press MENU. The on-screen menu opens with the Picture menu displayed. 2 Press or to highlight Settings. The Settings menu opens. Press or ENTER/ to access the menu.
-
 1
1 -
2
-
3
-
4
-
5
-
6
-
7
-
8
-
9
-
10
-
11
-
12
-
13
-
14
-
15
-
16
-
17
-
18
-
19
-
20
-
21
-
22
-
23
-
24
-
25
-
26
-
27
-
28
-
29
-
30
-
31
-
32
-
33
-
 34
34 -
 35
35 -
 36
36 -
 37
37 -
 38
38 -
 39
39 -
 40
40 -
 41
41 -
 42
42 -
 43
43 -
 44
44 -
45
-
46
-
47
-
48
 |
 |
