Epson ActionTower 3000 User Manual - Page 65
Installing the External Cache Chips, them. The pins should point inward at slightly less than
 |
View all Epson ActionTower 3000 manuals
Add to My Manuals
Save this manual to your list of manuals |
Page 65 highlights
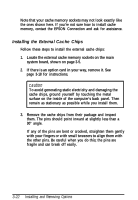
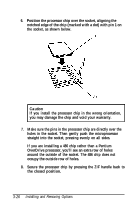
Note that your cache memory sockets may not look exactly like the ones shown here. If you're not sure how to install cache memory, contact the EPSON Connection and ask for assistance. Installing the External Cache Chips Follow these steps to install the external cache chips: 1. Locate the external cache memory sockets on the main system board, shown on page 3-5. 2. If there is an option card in your way, remove it. See page 3-18 for instructions. caution To avoid generating static electricity and damaging the cache chips, ground yourself by touching the metal surface on the inside of the computer's back panel. Then remain as stationary as possible while you install them. 3. Remove the cache chips from their package and inspect them. The pins should point inward at slightly less than a 90° angle. If any of the pins are bent or crooked, straighten them gently with your fingers or with small tweezers to align them with the other pins. Be careful when you do this; the pins are fragile and can break off easily. 3-22 Installing and Removing Options
-
 1
1 -
2
-
3
-
4
-
5
-
6
-
7
-
8
-
9
-
10
-
11
-
12
-
13
-
14
-
15
-
16
-
17
-
18
-
19
-
20
-
21
-
22
-
23
-
24
-
25
-
26
-
27
-
28
-
29
-
30
-
31
-
32
-
33
-
34
-
35
-
36
-
37
-
38
-
39
-
40
-
41
-
42
-
43
-
44
-
45
-
46
-
47
-
48
-
49
-
50
-
51
-
52
-
53
-
54
-
55
-
56
-
57
-
58
-
59
-
 60
60 -
 61
61 -
 62
62 -
 63
63 -
 64
64 -
 65
65 -
 66
66 -
 67
67 -
 68
68 -
 69
69 -
 70
70 -
71
-
72
-
73
-
74
-
75
-
76
-
77
-
78
-
79
-
80
-
81
-
82
-
83
-
84
-
85
-
86
-
87
-
88
-
89
-
90
-
91
-
92
-
93
-
94
-
95
-
96
-
97
-
98
-
99
-
100
-
101
-
102
-
103
-
104
-
105
-
106
-
107
-
108
-
109
-
110
-
111
-
112
-
113
-
114
-
115
-
116
-
117
-
118
-
119
-
120
-
121
-
122
-
123
-
124
-
125
-
126
-
127
-
128
-
129
-
130
-
131
-
132
-
133
-
134
-
135
-
136
-
137
 |
 |
