Epson ActionTower 3000 User Manual - Page 89
Removing a Drive From the Rear Internal Drive Bay
 |
View all Epson ActionTower 3000 manuals
Add to My Manuals
Save this manual to your list of manuals |
Page 89 highlights
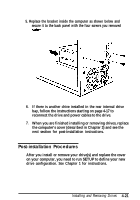
Removing a Drive From the Rear Internal Drive Bay Follow these steps to remove a drive from the rear internal drive bay: 1. Remove the drive ribbon cable and power cable from the back of each drive in the rear internal bay. 2. If you will be removing your only IDE hard disk drive, disconnect the hard disk drive ribbon cable from its connector on the main system board. Installing and Removing Drives 4-19
-
 1
1 -
2
-
3
-
4
-
5
-
6
-
7
-
8
-
9
-
10
-
11
-
12
-
13
-
14
-
15
-
16
-
17
-
18
-
19
-
20
-
21
-
22
-
23
-
24
-
25
-
26
-
27
-
28
-
29
-
30
-
31
-
32
-
33
-
34
-
35
-
36
-
37
-
38
-
39
-
40
-
41
-
42
-
43
-
44
-
45
-
46
-
47
-
48
-
49
-
50
-
51
-
52
-
53
-
54
-
55
-
56
-
57
-
58
-
59
-
60
-
61
-
62
-
63
-
64
-
65
-
66
-
67
-
68
-
69
-
70
-
71
-
72
-
73
-
74
-
75
-
76
-
77
-
78
-
79
-
80
-
81
-
82
-
83
-
 84
84 -
 85
85 -
 86
86 -
 87
87 -
 88
88 -
 89
89 -
 90
90 -
 91
91 -
 92
92 -
 93
93 -
 94
94 -
95
-
96
-
97
-
98
-
99
-
100
-
101
-
102
-
103
-
104
-
105
-
106
-
107
-
108
-
109
-
110
-
111
-
112
-
113
-
114
-
115
-
116
-
117
-
118
-
119
-
120
-
121
-
122
-
123
-
124
-
125
-
126
-
127
-
128
-
129
-
130
-
131
-
132
-
133
-
134
-
135
-
136
-
137
 |
 |

Removing a Drive From the Rear Internal Drive Bay
Follow these steps to remove a drive from the rear internal
drive bay:
1.
Remove the drive ribbon cable and power cable from the back
of each drive in the rear internal bay.
2.
If you will be removing your only IDE hard disk drive,
disconnect
the hard disk drive ribbon cable from its
connector on the main system board.
Installing and Removing Drives
4-19