Epson ActionTower 3000 User Manual - Page 72
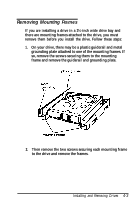
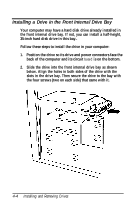
Remove mounting frames, Installing and Removing Drives
 |
View all Epson ActionTower 3000 manuals
Add to My Manuals
Save this manual to your list of manuals |
Page 72 highlights
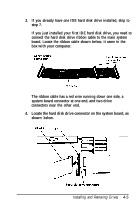
To install or remove a drive, first remove the computer's cover as described in Chapter 3. Then remove any option cards to access the drive bays. Once you have installed the drive, replace any option cards you removed. See Chapter 3 for instructions. Follow the appropriate instructions in this chapter to install and remove drives: Remove mounting frames Install a drive in the front internal drive bay Remove a drive from the front internal drive bay Install a drive in an external drive bay Remove a drive from an external drive bay Install a drive in the rear internal drive bay Remove a drive from the rear internal drive bay Perform post-installation procedures. Be sure to check the jumper settings on the hard disk drive before you install it. If you have two hard disk drives, one must be configured as the master (which contains the operating system) and the other as the slave. A table of jumper settings for high-capacity EPSON drives is included in Appendix A. Also, you may need to know the number of cylinders, heads, sectors, etc., if the hard disk drive auto-sensing feature in SETUP is unable to correctly identify your drive. The hard disk drive table used in the SETUP program is included in Appendix A. If your drive is not listed or you need more information, see the documentatin that came with your drive or contact the manufacturer. 4-2 Installing and Removing Drives
-
 1
1 -
2
-
3
-
4
-
5
-
6
-
7
-
8
-
9
-
10
-
11
-
12
-
13
-
14
-
15
-
16
-
17
-
18
-
19
-
20
-
21
-
22
-
23
-
24
-
25
-
26
-
27
-
28
-
29
-
30
-
31
-
32
-
33
-
34
-
35
-
36
-
37
-
38
-
39
-
40
-
41
-
42
-
43
-
44
-
45
-
46
-
47
-
48
-
49
-
50
-
51
-
52
-
53
-
54
-
55
-
56
-
57
-
58
-
59
-
60
-
61
-
62
-
63
-
64
-
65
-
66
-
 67
67 -
 68
68 -
 69
69 -
 70
70 -
 71
71 -
 72
72 -
 73
73 -
 74
74 -
 75
75 -
 76
76 -
 77
77 -
78
-
79
-
80
-
81
-
82
-
83
-
84
-
85
-
86
-
87
-
88
-
89
-
90
-
91
-
92
-
93
-
94
-
95
-
96
-
97
-
98
-
99
-
100
-
101
-
102
-
103
-
104
-
105
-
106
-
107
-
108
-
109
-
110
-
111
-
112
-
113
-
114
-
115
-
116
-
117
-
118
-
119
-
120
-
121
-
122
-
123
-
124
-
125
-
126
-
127
-
128
-
129
-
130
-
131
-
132
-
133
-
134
-
135
-
136
-
137
 |
 |
