Epson ActionTower 3000 User Manual - Page 75
Installing and Removing Drives, system board connector at one end, and two drive
 |
View all Epson ActionTower 3000 manuals
Add to My Manuals
Save this manual to your list of manuals |
Page 75 highlights
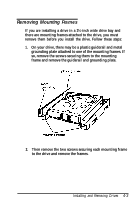
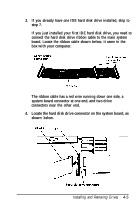
3. If you already have one IDE hard disk drive installed, skip to step 7. If you just installed your first IDE hard disk drive, you need to connect the hard disk drive ribbon cable to the main system board. Locate the ribbon cable shown below; it came in the box with your computer. The ribbon cable has a red wire running down one side, a system board connector at one end, and two drive connectors near the other end. 4. Locate the hard disk drive connector on the system board, as shown below. Installing and Removing Drives 4-5
-
 1
1 -
2
-
3
-
4
-
5
-
6
-
7
-
8
-
9
-
10
-
11
-
12
-
13
-
14
-
15
-
16
-
17
-
18
-
19
-
20
-
21
-
22
-
23
-
24
-
25
-
26
-
27
-
28
-
29
-
30
-
31
-
32
-
33
-
34
-
35
-
36
-
37
-
38
-
39
-
40
-
41
-
42
-
43
-
44
-
45
-
46
-
47
-
48
-
49
-
50
-
51
-
52
-
53
-
54
-
55
-
56
-
57
-
58
-
59
-
60
-
61
-
62
-
63
-
64
-
65
-
66
-
67
-
68
-
69
-
 70
70 -
 71
71 -
 72
72 -
 73
73 -
 74
74 -
 75
75 -
 76
76 -
 77
77 -
 78
78 -
 79
79 -
 80
80 -
81
-
82
-
83
-
84
-
85
-
86
-
87
-
88
-
89
-
90
-
91
-
92
-
93
-
94
-
95
-
96
-
97
-
98
-
99
-
100
-
101
-
102
-
103
-
104
-
105
-
106
-
107
-
108
-
109
-
110
-
111
-
112
-
113
-
114
-
115
-
116
-
117
-
118
-
119
-
120
-
121
-
122
-
123
-
124
-
125
-
126
-
127
-
128
-
129
-
130
-
131
-
132
-
133
-
134
-
135
-
136
-
137
 |
 |

3.
If you already have one IDE hard disk drive installed, skip to
step 7.
If you just installed your first IDE hard disk drive, you need to
connect the hard disk drive ribbon cable to the main system
board. Locate the ribbon cable shown below; it came in the
box with your computer.
The ribbon cable has a red wire running down one side, a
system board connector at one end, and two drive
connectors near the other end.
4.
Locate the hard disk drive connector on the system board, as
shown below.
Installing and Removing Drives
4-5