Epson ActionTower 3000 User Manual - Page 86
the end of the bracket, as shown below. Then slide
 |
View all Epson ActionTower 3000 manuals
Add to My Manuals
Save this manual to your list of manuals |
Page 86 highlights
3. Remove the four screws securing the rear internal drive bay bracket to the computer's back panel. Then slide the bracket out of the computer. 4. Place the bracket on your work surface as shown in the next illustration. 5. Position the drive so that its drive and power connectors face the end of the bracket, as shown below. Then slide the drive into the appropriate bay in the bracket and secure it with the four screws that came with the drive. 4-16 Installing and Removing Drives
-
 1
1 -
2
-
3
-
4
-
5
-
6
-
7
-
8
-
9
-
10
-
11
-
12
-
13
-
14
-
15
-
16
-
17
-
18
-
19
-
20
-
21
-
22
-
23
-
24
-
25
-
26
-
27
-
28
-
29
-
30
-
31
-
32
-
33
-
34
-
35
-
36
-
37
-
38
-
39
-
40
-
41
-
42
-
43
-
44
-
45
-
46
-
47
-
48
-
49
-
50
-
51
-
52
-
53
-
54
-
55
-
56
-
57
-
58
-
59
-
60
-
61
-
62
-
63
-
64
-
65
-
66
-
67
-
68
-
69
-
70
-
71
-
72
-
73
-
74
-
75
-
76
-
77
-
78
-
79
-
80
-
 81
81 -
 82
82 -
 83
83 -
 84
84 -
 85
85 -
 86
86 -
 87
87 -
 88
88 -
 89
89 -
 90
90 -
 91
91 -
92
-
93
-
94
-
95
-
96
-
97
-
98
-
99
-
100
-
101
-
102
-
103
-
104
-
105
-
106
-
107
-
108
-
109
-
110
-
111
-
112
-
113
-
114
-
115
-
116
-
117
-
118
-
119
-
120
-
121
-
122
-
123
-
124
-
125
-
126
-
127
-
128
-
129
-
130
-
131
-
132
-
133
-
134
-
135
-
136
-
137
 |
 |

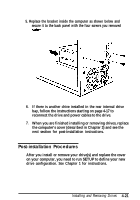
3.
4.
5.
Remove the four screws securing the rear internal drive bay
bracket to the computer’s back panel. Then slide the
bracket out of the computer.
Place the bracket on your work surface as shown in the next
illustration.
Position the drive so that its drive and power connectors face
the end of the bracket, as shown below. Then slide the
drive into the appropriate bay in the bracket and secure it
with the four screws that came with the drive.
4-16
Installing and Removing Drives