Epson ActionTower 3000 User Manual - Page 76
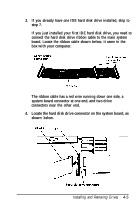
pin 1. The number 1 or 2 may be stamped on
 |
View all Epson ActionTower 3000 manuals
Add to My Manuals
Save this manual to your list of manuals |
Page 76 highlights
5. Position the ribbon cable's system board connector so that the side of the ribbon cable with the red wire is closest to the pin identification markings "1" and "2" printed on the system board. 6. Make sure the holes in the ribbon cable connector fit over the pins in the system board connector; then push in the ribbon cable connector. If you do not correctly align the holes with the pins, you could severely damage your system board when you push in the ribbon cable connector 7. Now locate the side of the hard drive connector that contains pin 1. The number "1" or "2" may be stamped on the connector casing or printed on the drive's circuit board to identify the side of the cornnector containing pin 1. If the number does not appear on the connector casing, remove the drive and turn it over to check the circuit board. 4-6 lnstalling and Removing Drives
-
 1
1 -
2
-
3
-
4
-
5
-
6
-
7
-
8
-
9
-
10
-
11
-
12
-
13
-
14
-
15
-
16
-
17
-
18
-
19
-
20
-
21
-
22
-
23
-
24
-
25
-
26
-
27
-
28
-
29
-
30
-
31
-
32
-
33
-
34
-
35
-
36
-
37
-
38
-
39
-
40
-
41
-
42
-
43
-
44
-
45
-
46
-
47
-
48
-
49
-
50
-
51
-
52
-
53
-
54
-
55
-
56
-
57
-
58
-
59
-
60
-
61
-
62
-
63
-
64
-
65
-
66
-
67
-
68
-
69
-
70
-
 71
71 -
 72
72 -
 73
73 -
 74
74 -
 75
75 -
 76
76 -
 77
77 -
 78
78 -
 79
79 -
 80
80 -
 81
81 -
82
-
83
-
84
-
85
-
86
-
87
-
88
-
89
-
90
-
91
-
92
-
93
-
94
-
95
-
96
-
97
-
98
-
99
-
100
-
101
-
102
-
103
-
104
-
105
-
106
-
107
-
108
-
109
-
110
-
111
-
112
-
113
-
114
-
115
-
116
-
117
-
118
-
119
-
120
-
121
-
122
-
123
-
124
-
125
-
126
-
127
-
128
-
129
-
130
-
131
-
132
-
133
-
134
-
135
-
136
-
137
 |
 |
