Epson ActionTower 3000 User Manual - Page 80
Installing a Drive in an External Drive Bay
 |
View all Epson ActionTower 3000 manuals
Add to My Manuals
Save this manual to your list of manuals |
Page 80 highlights
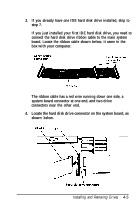
Installing a Drive in an External Drive Bay Follow these steps to install an internal or externally accessible drive in an externally accessible drive bay: 1. Remove the slot cover from the drive bay you are going to use. Reach through the back of the bay and push the slot cover out the front of the bay. 2. Position the drive so its drive and power connectors face the back of the computer. 4-10 Installing and Removing Drives
-
 1
1 -
2
-
3
-
4
-
5
-
6
-
7
-
8
-
9
-
10
-
11
-
12
-
13
-
14
-
15
-
16
-
17
-
18
-
19
-
20
-
21
-
22
-
23
-
24
-
25
-
26
-
27
-
28
-
29
-
30
-
31
-
32
-
33
-
34
-
35
-
36
-
37
-
38
-
39
-
40
-
41
-
42
-
43
-
44
-
45
-
46
-
47
-
48
-
49
-
50
-
51
-
52
-
53
-
54
-
55
-
56
-
57
-
58
-
59
-
60
-
61
-
62
-
63
-
64
-
65
-
66
-
67
-
68
-
69
-
70
-
71
-
72
-
73
-
74
-
 75
75 -
 76
76 -
 77
77 -
 78
78 -
 79
79 -
 80
80 -
 81
81 -
 82
82 -
 83
83 -
 84
84 -
 85
85 -
86
-
87
-
88
-
89
-
90
-
91
-
92
-
93
-
94
-
95
-
96
-
97
-
98
-
99
-
100
-
101
-
102
-
103
-
104
-
105
-
106
-
107
-
108
-
109
-
110
-
111
-
112
-
113
-
114
-
115
-
116
-
117
-
118
-
119
-
120
-
121
-
122
-
123
-
124
-
125
-
126
-
127
-
128
-
129
-
130
-
131
-
132
-
133
-
134
-
135
-
136
-
137
 |
 |

Installing a Drive in an External Drive Bay
Follow these steps to install an internal or externally accessible
drive in an externally accessible drive bay:
1.
Remove the slot cover from the drive bay you are going to
use. Reach through the back of the bay and push the slot
cover out the front of the bay.
2.
Position the drive so its drive and power connectors face the
back of the computer.
4-10
Installing and Removing Drives