Epson F2000 Users Guide - Page 47
Adjusting the Height of the Platen, Parent topic, Ready, Platen Height Error, Platen, Height Error
 |
View all Epson F2000 manuals
Add to My Manuals
Save this manual to your list of manuals |
Page 47 highlights
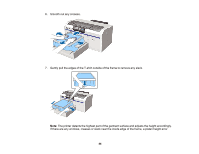
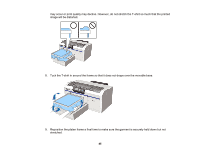
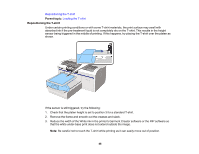
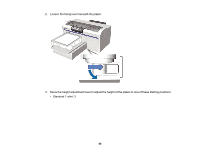
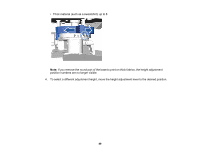
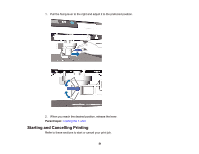
Parent topic: Loading a T-shirt on the Platen Adjusting the Height of the Platen If the print surface is too far from the print head, print quality declines and ink may mist on the inside of the printer. To prevent this, adjust the platen to its optimum height. As a rule, the optimum platen height is one position from the first Ready message on the LCD screen or two positions from the last Platen Height Error message. For example, if the printer displays a Platen Height Error message at position number 1, select position number 3 as the optimum platen height. If the printer displays a Ready message at position number 2, select position number 3 as the optimum platen height. Position number P 1 2 3 LCD message Platen Height Error Platen Height Error Ready Ready (optimum platen height) Note: The positions above assume that the printed surface of the garment is the highest surface on the platen. Seams, collars, zippers, pockets, and other raised areas will require a higher platen height and result in reduced print quality. Caution: Incorrect platen height settings cause excessive ink mist buildup inside the printer. If you notice ink mist accumulating quickly, adjust your platen height settings. 1. If the platen is not in the forward position, press the moveable base button to move the platen forward. 47
-
 1
1 -
2
-
3
-
4
-
5
-
6
-
7
-
8
-
9
-
10
-
11
-
12
-
13
-
14
-
15
-
16
-
17
-
18
-
19
-
20
-
21
-
22
-
23
-
24
-
25
-
26
-
27
-
28
-
29
-
30
-
31
-
32
-
33
-
34
-
35
-
36
-
37
-
38
-
39
-
40
-
41
-
 42
42 -
 43
43 -
 44
44 -
 45
45 -
 46
46 -
 47
47 -
 48
48 -
 49
49 -
 50
50 -
 51
51 -
 52
52 -
53
-
54
-
55
-
56
-
57
-
58
-
59
-
60
-
61
-
62
-
63
-
64
-
65
-
66
-
67
-
68
-
69
-
70
-
71
-
72
-
73
-
74
-
75
-
76
-
77
-
78
-
79
-
80
-
81
-
82
-
83
-
84
-
85
-
86
-
87
-
88
-
89
-
90
-
91
-
92
-
93
-
94
-
95
-
96
-
97
-
98
-
99
-
100
-
101
-
102
-
103
-
104
-
105
-
106
-
107
-
108
-
109
-
110
-
111
-
112
-
113
-
114
-
115
-
116
-
117
-
118
-
119
-
120
-
121
-
122
-
123
-
124
-
125
-
126
-
127
-
128
-
129
-
130
-
131
-
132
-
133
-
134
-
135
-
136
-
137
-
138
-
139
-
140
-
141
-
142
-
143
-
144
-
145
-
146
-
147
-
148
-
149
-
150
-
151
-
152
-
153
-
154
-
155
-
156
-
157
-
158
-
159
-
160
-
161
-
162
-
163
-
164
-
165
-
166
-
167
-
168
-
169
-
170
-
171
-
172
-
173
-
174
-
175
 |
 |
