Epson F2000 Users Guide - Page 52
Starting a Print Job, Cancelling a Print Job, Parent topic, Nozzle, Check, Cleaning, Nozzle Check
 |
View all Epson F2000 manuals
Add to My Manuals
Save this manual to your list of manuals |
Page 52 highlights
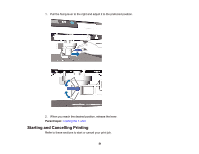
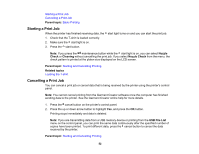
Starting a Print Job Cancelling a Print Job Parent topic: Basic Printing Starting a Print Job When the printer has finished receiving data, the 1. Check that the T-shirt is loaded correctly. 2. Make sure the start light is on. 3. Press the start button. start light turns on and you can start the print job. Note: If you press the maintenance button while the start light is on, you can select Nozzle Check or Cleaning without cancelling the print job. If you select Nozzle Check from the menu, the check pattern is printed at the platen size displayed on the LCD screen. Parent topic: Starting and Cancelling Printing Related topics Loading the T-shirt Cancelling a Print Job You can cancel a print job or cancel data that is being received by the printer using the printer's control panel. Note: You cannot cancel printing from the Garment Creator software once the computer has finished sending data to the printer. See the Garment Creator online help for more details. 1. Press the cancel button on the printer's control panel. 2. Press the up or down arrow button to highlight Yes, and press the OK button. Printing stops immediately and data is deleted. Note: If you are transmitting data from a USB memory device or printing from the USB File List menu on the control panel, you can print the same data continuously after the specified number of copies have been printed. To print different data, press the cancel button to cancel the data received by the printer. Parent topic: Starting and Cancelling Printing 52
-
 1
1 -
2
-
3
-
4
-
5
-
6
-
7
-
8
-
9
-
10
-
11
-
12
-
13
-
14
-
15
-
16
-
17
-
18
-
19
-
20
-
21
-
22
-
23
-
24
-
25
-
26
-
27
-
28
-
29
-
30
-
31
-
32
-
33
-
34
-
35
-
36
-
37
-
38
-
39
-
40
-
41
-
42
-
43
-
44
-
45
-
46
-
 47
47 -
 48
48 -
 49
49 -
 50
50 -
 51
51 -
 52
52 -
 53
53 -
 54
54 -
 55
55 -
 56
56 -
 57
57 -
58
-
59
-
60
-
61
-
62
-
63
-
64
-
65
-
66
-
67
-
68
-
69
-
70
-
71
-
72
-
73
-
74
-
75
-
76
-
77
-
78
-
79
-
80
-
81
-
82
-
83
-
84
-
85
-
86
-
87
-
88
-
89
-
90
-
91
-
92
-
93
-
94
-
95
-
96
-
97
-
98
-
99
-
100
-
101
-
102
-
103
-
104
-
105
-
106
-
107
-
108
-
109
-
110
-
111
-
112
-
113
-
114
-
115
-
116
-
117
-
118
-
119
-
120
-
121
-
122
-
123
-
124
-
125
-
126
-
127
-
128
-
129
-
130
-
131
-
132
-
133
-
134
-
135
-
136
-
137
-
138
-
139
-
140
-
141
-
142
-
143
-
144
-
145
-
146
-
147
-
148
-
149
-
150
-
151
-
152
-
153
-
154
-
155
-
156
-
157
-
158
-
159
-
160
-
161
-
162
-
163
-
164
-
165
-
166
-
167
-
168
-
169
-
170
-
171
-
172
-
173
-
174
-
175
 |
 |
