Epson F2000 Users Guide - Page 50
Adjusting the Angle of the Fixing Lever, Platen Height Error, Parent topic
 |
View all Epson F2000 manuals
Add to My Manuals
Save this manual to your list of manuals |
Page 50 highlights
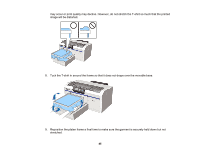
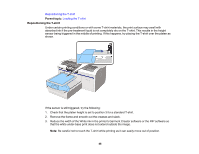
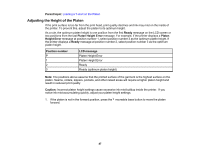
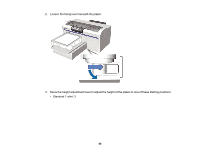
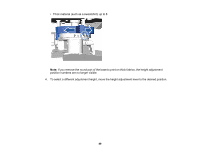
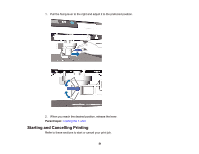
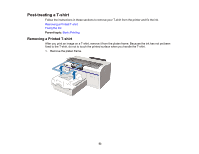
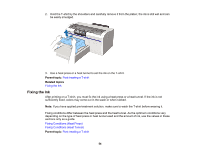
5. Tighten the fixing lever and secure the height adjustment lever. You can also adjust the angle of the fixing lever, if necessary. Note: Print quality may decline if you do not tighten the fixing lever. 6. Press the moveable base button to move the platen into the printer. 7. Check to see if Platen Height Error is displayed on the LCD screen and do one of the following: • If it is not displayed, repeat steps 1 through 6 and move the height adjustment lever one step to the left to raise the platen. Continue to raise the platen until the error is displayed. • If it is displayed on the LCD screen, repeat steps 1 through 6 and move the height adjustment lever one step to the right to lower the platen. Parent topic: Loading the T-shirt Adjusting the Angle of the Fixing Lever You can adjust the fixing lever of the platen to any angle that is easy to use. 50
-
 1
1 -
2
-
3
-
4
-
5
-
6
-
7
-
8
-
9
-
10
-
11
-
12
-
13
-
14
-
15
-
16
-
17
-
18
-
19
-
20
-
21
-
22
-
23
-
24
-
25
-
26
-
27
-
28
-
29
-
30
-
31
-
32
-
33
-
34
-
35
-
36
-
37
-
38
-
39
-
40
-
41
-
42
-
43
-
44
-
 45
45 -
 46
46 -
 47
47 -
 48
48 -
 49
49 -
 50
50 -
 51
51 -
 52
52 -
 53
53 -
 54
54 -
 55
55 -
56
-
57
-
58
-
59
-
60
-
61
-
62
-
63
-
64
-
65
-
66
-
67
-
68
-
69
-
70
-
71
-
72
-
73
-
74
-
75
-
76
-
77
-
78
-
79
-
80
-
81
-
82
-
83
-
84
-
85
-
86
-
87
-
88
-
89
-
90
-
91
-
92
-
93
-
94
-
95
-
96
-
97
-
98
-
99
-
100
-
101
-
102
-
103
-
104
-
105
-
106
-
107
-
108
-
109
-
110
-
111
-
112
-
113
-
114
-
115
-
116
-
117
-
118
-
119
-
120
-
121
-
122
-
123
-
124
-
125
-
126
-
127
-
128
-
129
-
130
-
131
-
132
-
133
-
134
-
135
-
136
-
137
-
138
-
139
-
140
-
141
-
142
-
143
-
144
-
145
-
146
-
147
-
148
-
149
-
150
-
151
-
152
-
153
-
154
-
155
-
156
-
157
-
158
-
159
-
160
-
161
-
162
-
163
-
164
-
165
-
166
-
167
-
168
-
169
-
170
-
171
-
172
-
173
-
174
-
175
 |
 |
