Epson FX 1170 Service Manual - Page 87
MOTOR ASSEMBLY, CR., CR, Face Screw, Spring .
 |
View all Epson FX 1170 manuals
Add to My Manuals
Save this manual to your list of manuals |
Page 87 highlights
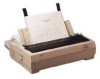
REV.-A 3.2.5.3 Removing the MOTOR ASSEMBLY, CR ..,., , r [STEP 11 Remove the PAPER GUIDE ASSEMBLY, top cover, front cover, paper eject cover, and tractor unit. ' (See Section 3.2.1.) [STEP 2] Remove the PANEL UNIT. (See Section 3.2.2.) [STEP 3] Remove the HOUSING ASSEMBLY, UPPER. (See Section 3.2.4.) [STEP 41 Remove the face screw (M3X7) securing the MOTOR ASSEMBLY, CR. After releasing the tension spring, disengage the TIMING BELT from the MOTOR ASSEMBLY, CR and hang it on the hook. [STEp 51 Disconnect the connector CN13 on the BOARD ASSEMBLY, C094 MAIN. Remove the MOTOR ASSEMBLY, CR. [STEp 61 Remove the two CBN (M3X6) screws on the back of the MOTOR ASSEMBLY, CR. Remove the MOTOR ASSEMBLY, CR. MOTOR ASSEMBLY, CR Face Screw (M3X7) =?* ! Spring . \\ '-%- i L F PLATE, BELT TENSION ! .) ' AJ L CBN (M3X6) ~-. \\\- -- ..% f.., ,.,:' Figure 3-10. Removing the MOTOR ASSEMBLY, CR Assembly Note Position the MOTOR ASSEMBLY, CR on the PLATE, BELT TENSION correctly as shown below. MOTOR ASSEMBLY, CR Figure 3-11. Positioning the MOTOR ASSEMBLY, CR 3-12
-
 1
1 -
2
-
3
-
4
-
5
-
6
-
7
-
8
-
9
-
10
-
11
-
12
-
13
-
14
-
15
-
16
-
17
-
18
-
19
-
20
-
21
-
22
-
23
-
24
-
25
-
26
-
27
-
28
-
29
-
30
-
31
-
32
-
33
-
34
-
35
-
36
-
37
-
38
-
39
-
40
-
41
-
42
-
43
-
44
-
45
-
46
-
47
-
48
-
49
-
50
-
51
-
52
-
53
-
54
-
55
-
56
-
57
-
58
-
59
-
60
-
61
-
62
-
63
-
64
-
65
-
66
-
67
-
68
-
69
-
70
-
71
-
72
-
73
-
74
-
75
-
76
-
77
-
78
-
79
-
80
-
81
-
 82
82 -
 83
83 -
 84
84 -
 85
85 -
 86
86 -
 87
87 -
 88
88 -
 89
89 -
 90
90 -
 91
91 -
 92
92 -
93
-
94
-
95
-
96
-
97
-
98
-
99
-
100
-
101
-
102
-
103
-
104
-
105
-
106
-
107
-
108
-
109
-
110
-
111
-
112
-
113
-
114
-
115
-
116
-
117
-
118
-
119
-
120
-
121
-
122
-
123
-
124
-
125
-
126
-
127
-
128
-
129
-
130
-
131
-
132
-
133
-
134
-
135
-
136
-
137
-
138
 |
 |
