Epson FX 1170 Service Manual - Page 98
Removing The Board Assembly, Housing Assembly, Upper. See Support L/f
 |
View all Epson FX 1170 manuals
Add to My Manuals
Save this manual to your list of manuals |
Page 98 highlights
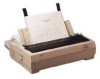
3.2.6 Removing the BOARD ASSEMBLY, C094 MAIN REV.-A [STEP 1] [STEP 21 [STEP 31 [STEP 41 [STEp 51 [STEP 61 [STEp 71 [STEP 81 [STEP 9] Remove the PAPER GUIDE ASSEMBLY, top cover, front cover, paper eject cover, and tractor unit. (See Section 3.2.1.) Remove the PANEL UNIT. (See Section 3.2.2.) Remove the HOUSING ASSEMBLY, UPPER. (See Section 3.2.4.) Remove the PRINTER MECHANISM. (See Section 3.2.5.) Disconnect the cable from connector CN2 on the BOARD ASSEMBLY, C076 PSB/pSE. Remove SUPPORT, l/F from the BOARD ASSEMBLY, C094 MAIN. Remove the two CBS (M3X12) screws securin9 the cover for the oPtional interface card" Remove the CBC (M3X8)screwandthe five CBB (M3X12) screws securing the BOARD ASSEMBLY, C094 MAIN. Remove the GROUNDING PMTE, I/F. Remove the BOARD ASSEMBLY, C094 MAIN. SUPPORT l/F \ . CBC (M3X8) 7! CBB (M3X12) @ / ) / / GROUNDING AI PLATE, l/F ," Card Figure 3-25. Removing the BOARD ASSEMBLY, C094 MAIN 3-23
-
 1
1 -
2
-
3
-
4
-
5
-
6
-
7
-
8
-
9
-
10
-
11
-
12
-
13
-
14
-
15
-
16
-
17
-
18
-
19
-
20
-
21
-
22
-
23
-
24
-
25
-
26
-
27
-
28
-
29
-
30
-
31
-
32
-
33
-
34
-
35
-
36
-
37
-
38
-
39
-
40
-
41
-
42
-
43
-
44
-
45
-
46
-
47
-
48
-
49
-
50
-
51
-
52
-
53
-
54
-
55
-
56
-
57
-
58
-
59
-
60
-
61
-
62
-
63
-
64
-
65
-
66
-
67
-
68
-
69
-
70
-
71
-
72
-
73
-
74
-
75
-
76
-
77
-
78
-
79
-
80
-
81
-
82
-
83
-
84
-
85
-
86
-
87
-
88
-
89
-
90
-
91
-
92
-
 93
93 -
 94
94 -
 95
95 -
 96
96 -
 97
97 -
 98
98 -
 99
99 -
 100
100 -
 101
101 -
 102
102 -
 103
103 -
104
-
105
-
106
-
107
-
108
-
109
-
110
-
111
-
112
-
113
-
114
-
115
-
116
-
117
-
118
-
119
-
120
-
121
-
122
-
123
-
124
-
125
-
126
-
127
-
128
-
129
-
130
-
131
-
132
-
133
-
134
-
135
-
136
-
137
-
138
 |
 |
