Epson PhotoPC User Manual - Page 41
Changing File Information, From the Photo Workshop screen, choose Save As from the File
 |
View all Epson PhotoPC manuals
Add to My Manuals
Save this manual to your list of manuals |
Page 41 highlights
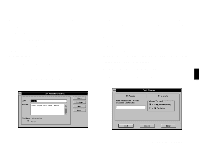
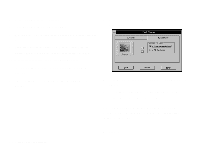
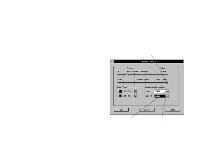
Changing File Information When you work with EasyPhoto, you don't need to keep track of your picture files. EasyPhoto does it for you. However, you can change a picture's file name, file type, or location if you want. Follow these steps: 1 From the Photo Workshop screen, choose Save As from the File menu. The Save As box appears. EasyPhoto automatically stores your picture files in the C:\EZPHOTO\PHOTO directory. The files are named according to the date and order in which they were transferred from the camera. The file type is JPEG (*.JPG), which provides high image quality in small, compressed files. 2 Choose the drive and directory where you want to save the file. 3 Choose the file type: either JPEG or BMP. BMP files are larger (in bytes) than JPEG files, but they can be inserted or imported into most Windows software applications. 4 Type a name for the file in the File Name box. The name you type replaces the name originally displayed. 5 Click OK. EasyPhoto saves a copy of your picture with the new information. When you exit the Photo Workshop and return to the photo gallery, you see a copy of your picture displaying the new file name as its title. You have two copies of the picture: one with the new file information and one with the original file information. You can delete the original if you don't need it. 4-8 Working with Your Pictures
-
 1
1 -
2
-
3
-
4
-
5
-
6
-
7
-
8
-
9
-
10
-
11
-
12
-
13
-
14
-
15
-
16
-
17
-
18
-
19
-
20
-
21
-
22
-
23
-
24
-
25
-
26
-
27
-
28
-
29
-
30
-
31
-
32
-
33
-
34
-
35
-
 36
36 -
 37
37 -
 38
38 -
 39
39 -
 40
40 -
 41
41 -
 42
42 -
 43
43 -
 44
44 -
 45
45 -
 46
46 -
47
-
48
-
49
-
50
-
51
-
52
-
53
-
54
-
55
-
56
-
57
-
58
-
59
-
60
-
61
-
62
-
63
 |
 |
