Epson PowerLite 4300 User's Guide - Page 12
Unpacking the Projector, Additional Components - pdf
 |
View all Epson PowerLite 4300 manuals
Add to My Manuals
Save this manual to your list of manuals |
Page 12 highlights
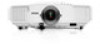
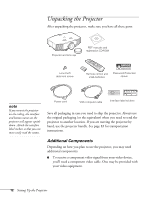
Unpacking the Projector After unpacking the projector, make sure you have all these parts: Projector and lens cap PDF manuals and registration CD-ROM Lens theft deterrent screw Remote control and 2 AA batteries Password Protected sticker note If you mount the projector on the ceiling, the interface and button names on the projector will appear upside down. Attach the interface label stickers so that you can more easily read the names. Power cord VGA computer cable Interface label stickers Save all packaging in case you need to ship the projector. Always use the original packaging (or the equivalent) when you need to send the projector to another location. If you are moving the projector by hand, use the projector handle. See page 83 for transportation instructions. Additional Components Depending on how you plan to use the projector, you may need additional components: ■ To receive a component video signal from your video device, you'll need a component video cable. One may be provided with your video equipment. 12 Setting Up the Projector
-
 1
1 -
2
-
3
-
4
-
5
-
6
-
 7
7 -
 8
8 -
 9
9 -
 10
10 -
 11
11 -
 12
12 -
 13
13 -
 14
14 -
 15
15 -
 16
16 -
 17
17 -
18
-
19
-
20
-
21
-
22
-
23
-
24
-
25
-
26
-
27
-
28
-
29
-
30
-
31
-
32
-
33
-
34
-
35
-
36
-
37
-
38
-
39
-
40
-
41
-
42
-
43
-
44
-
45
-
46
-
47
-
48
-
49
-
50
-
51
-
52
-
53
-
54
-
55
-
56
-
57
-
58
-
59
-
60
-
61
-
62
-
63
-
64
-
65
-
66
-
67
-
68
-
69
-
70
-
71
-
72
-
73
-
74
-
75
-
76
-
77
-
78
-
79
-
80
-
81
-
82
-
83
-
84
-
85
-
86
-
87
-
88
-
89
-
90
-
91
-
92
-
93
-
94
-
95
-
96
-
97
-
98
-
99
-
100
-
101
-
102
-
103
-
104
-
105
-
106
-
107
-
108
-
109
-
110
-
111
-
112
-
113
-
114
-
115
-
116
-
117
-
118
-
119
-
120
-
121
-
122
-
123
-
124
 |
 |
