Epson PowerLite 4300 User's Guide - Page 21
Connecting a Component Video Source, projector. Match the Y/Cb/Cr or Y/Pb/Pr connectors on your
 |
View all Epson PowerLite 4300 manuals
Add to My Manuals
Save this manual to your list of manuals |
Page 21 highlights
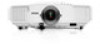
Connecting a Component Video Source 1. Look at the connectors at one end of your component video cable. If they are bayonet (BNC) connectors, go on to step 2. If they are RCA connectors, you'll need to attach commercially available BNC adapters to plug the cable into your projector, then continue with step 2. 2. Connect the cable to your player and the BNC connectors on the projector. Match the Y/Cb/Cr (or Y/Pb/Pr) connectors on your player to the corresponding connectors on the projector. 3. You may need to change the Input Signal setting in the projector's Signal menu to Component (see page 59). 4. When you've finished making any connections, see page 23 for instructions on turning on the projector and Chapter 2 for instructions on displaying and adjusting the image. note If the component video cable was not provided with your video device, you can purchase one from an electronics dealer. note Be sure your video player is not an RGB video source. If you select the wrong source, image quality may suffer. Check your video player's documentation. Also, make sure the Input Signal setting in the Signal menu is set to Auto or Component (see page 59). note If you have a component-to-VGA video cable, you can use it to connect a component video source. Connect the VGA connector to the projector's Computer1 port, then connect the other end of the cable to your player. Setting Up the Projector 21
-
 1
1 -
2
-
3
-
4
-
5
-
6
-
7
-
8
-
9
-
10
-
11
-
12
-
13
-
14
-
15
-
 16
16 -
 17
17 -
 18
18 -
 19
19 -
 20
20 -
 21
21 -
 22
22 -
 23
23 -
 24
24 -
 25
25 -
 26
26 -
27
-
28
-
29
-
30
-
31
-
32
-
33
-
34
-
35
-
36
-
37
-
38
-
39
-
40
-
41
-
42
-
43
-
44
-
45
-
46
-
47
-
48
-
49
-
50
-
51
-
52
-
53
-
54
-
55
-
56
-
57
-
58
-
59
-
60
-
61
-
62
-
63
-
64
-
65
-
66
-
67
-
68
-
69
-
70
-
71
-
72
-
73
-
74
-
75
-
76
-
77
-
78
-
79
-
80
-
81
-
82
-
83
-
84
-
85
-
86
-
87
-
88
-
89
-
90
-
91
-
92
-
93
-
94
-
95
-
96
-
97
-
98
-
99
-
100
-
101
-
102
-
103
-
104
-
105
-
106
-
107
-
108
-
109
-
110
-
111
-
112
-
113
-
114
-
115
-
116
-
117
-
118
-
119
-
120
-
121
-
122
-
123
-
124
 |
 |