Epson PowerLite 4300 User's Guide - Page 16
Connecting to a Computer
 |
View all Epson PowerLite 4300 manuals
Add to My Manuals
Save this manual to your list of manuals |
Page 16 highlights
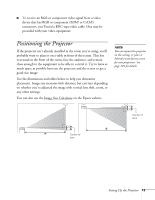
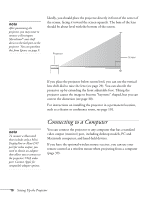
note After positioning the projector, you may want to connect a Kensington MicroSaver® anti-theft device to the lock port on the projector. You can purchase this from Epson; see page 9. Ideally, you should place the projector directly in front of the center of the screen, facing it toward the screen squarely. The base of the lens should be about level with the bottom of the screen. Projector Screen If you place the projector below screen level, you can use the vertical lens shift dial to raise the lens (see page 29). You can also tilt the projector up by extending the front adjustable foot. Tilting the projector causes the image to become "keystone" shaped, but you can correct the distortion (see page 30). For instructions on installing the projector in a permanent location, such as a theater or conference room, see page 101. note To connect a Macintosh that includes only a Mini DisplayPort or Mini-DVI port for video output, you need to obtain an adapter that allows you to connect to the projector's VGA video port. Contact Apple for compatible adapter options. Connecting to a Computer You can connect the projector to any computer that has a standard video output (monitor) port, including desktop models, PC and Macintosh computers, and hand-held devices. If you have the optional wireless mouse receiver, you can use your remote control as a wireless mouse when projecting from a computer (page 39). 16 Setting Up the Projector
-
 1
1 -
2
-
3
-
4
-
5
-
6
-
7
-
8
-
9
-
10
-
 11
11 -
 12
12 -
 13
13 -
 14
14 -
 15
15 -
 16
16 -
 17
17 -
 18
18 -
 19
19 -
 20
20 -
 21
21 -
22
-
23
-
24
-
25
-
26
-
27
-
28
-
29
-
30
-
31
-
32
-
33
-
34
-
35
-
36
-
37
-
38
-
39
-
40
-
41
-
42
-
43
-
44
-
45
-
46
-
47
-
48
-
49
-
50
-
51
-
52
-
53
-
54
-
55
-
56
-
57
-
58
-
59
-
60
-
61
-
62
-
63
-
64
-
65
-
66
-
67
-
68
-
69
-
70
-
71
-
72
-
73
-
74
-
75
-
76
-
77
-
78
-
79
-
80
-
81
-
82
-
83
-
84
-
85
-
86
-
87
-
88
-
89
-
90
-
91
-
92
-
93
-
94
-
95
-
96
-
97
-
98
-
99
-
100
-
101
-
102
-
103
-
104
-
105
-
106
-
107
-
108
-
109
-
110
-
111
-
112
-
113
-
114
-
115
-
116
-
117
-
118
-
119
-
120
-
121
-
122
-
123
-
124
 |
 |
